What is it?
![]() is an open-source software testing framework that can be used for functional,
integration, acceptance and unit testing across various teams. It is designed to provide
complete control of how tests are written and executed by allowing to write tests and
define test flow explicitly as Python code. It uses everything is a test approach
with the focus on giving test authors flexibility in writing and running their tests.
It’s designed to meet the needs of small QA groups at software startup companies
while providing the tools to meet the formalities of the large enterprise QA groups
producing professional test process documentation that includes detailed test and
software requirements specifications as well as requirements coverage, official test
and metrics reports. Designed for large scale test analytics processing using
ClickHouse and Grafana and built on top of a messaging protocol to allow
writing advanced parallel tests that require test-to-test communication
and could be executed in a hive mode on multi-node clusters.
is an open-source software testing framework that can be used for functional,
integration, acceptance and unit testing across various teams. It is designed to provide
complete control of how tests are written and executed by allowing to write tests and
define test flow explicitly as Python code. It uses everything is a test approach
with the focus on giving test authors flexibility in writing and running their tests.
It’s designed to meet the needs of small QA groups at software startup companies
while providing the tools to meet the formalities of the large enterprise QA groups
producing professional test process documentation that includes detailed test and
software requirements specifications as well as requirements coverage, official test
and metrics reports. Designed for large scale test analytics processing using
ClickHouse and Grafana and built on top of a messaging protocol to allow
writing advanced parallel tests that require test-to-test communication
and could be executed in a hive mode on multi-node clusters.
Differentiating Features
![]() has the following differentiating features that makes
it stand out from a plenty of other open and closed source test frameworks.
has the following differentiating features that makes
it stand out from a plenty of other open and closed source test frameworks.
The framework has many advanced features but it allows you to use only the pieces that you need. For example, if you don’t want to use requirements you don’t have to or if you don’t want to break your tests into steps or using behavior driven step keywords that is perfectly fine. At the heart, it is just a collection of Python modules so you are always in control and you are not forced to use anything that you don’t need.
An enterprise quality assurance process must always revolve around requirements. However, requirements are most often ignored in software development groups even at large companies. The framework is designed to break that trend and allows to write and work with requirements just like you work with code. However, if you are not ready to use requirements then you don’t have to.
Whether you realize it or not the only true purpose of writing any test is to verify one or more requirements and it does not really matter if you have clearly identified these requirements or not. Tests verify requirements and each requirement must be verified by either fully automated, semi-automated or manual test. If you don’t have any tests to verify some requirement then you can’t be sure that requirement is met or that the next version of your software does not break it.
With ![]() , you don’t have to wait for your company’s culture to change in relation
to handling and managing requirements. You are able
to write and manage requirements yourself, just like code. Requirements are simply
written in a Markdown document, where each requirement has a unique identifier and version.
These documents are the source of the requirements that you can convert to Python requirement objects,
which you can easily link with your tests. To match the complexities of real world requirement verification,
, you don’t have to wait for your company’s culture to change in relation
to handling and managing requirements. You are able
to write and manage requirements yourself, just like code. Requirements are simply
written in a Markdown document, where each requirement has a unique identifier and version.
These documents are the source of the requirements that you can convert to Python requirement objects,
which you can easily link with your tests. To match the complexities of real world requirement verification,
![]() allows one-to-one, one-to-many, many-to-one, or many-to-many test-to-requirement
relationships.
allows one-to-one, one-to-many, many-to-one, or many-to-many test-to-requirement
relationships.
Write Python test programs and not just tests. A test program can execute any number of tests. This provides the unrivalled flexibility to meet the needs of any project. Tests are not decoupled from test flow where the flow defines a precise order of how tests are executed. However, you can write many kinds of test runners using the framework if you need them. For example, you can write test programs that read test cases from databases, API endpoints, or file systems and trigger your test cases based on any condition. By writing a test program you are in total control of how you want to structure and approach the testing of a given project.
Through its flexibility, ![]() helps to avoid test tool fragmentation
where each project in a company eventually starts to use their own test framework
and nobody knows how to run tests written by other groups and reporting accross
groups become inconsistent and difficult to follow.
helps to avoid test tool fragmentation
where each project in a company eventually starts to use their own test framework
and nobody knows how to run tests written by other groups and reporting accross
groups become inconsistent and difficult to follow.
Provides tools for test authors to break tests into test Steps and use behavior driven step keywords such as Given, When, Then and others to make tests and test procedures pleasantly readable. Breaking tests into steps brings an advantage of test code becoming self-documenting, it provides an easy way to auto-generate formal documentation such as a test specification without doing any extra work, produces detailed test logs and facilitates test failure debugging.
Test steps can also be made reusable, allowing test authors to create reusable steps modules that greatly simplify writing new test scenarios. Just like you write regular programs by using function calls you can modularize tests by using reusable test steps. Using reusable steps produces clean test code and greatly improves readability and maintainability of tests.
If your test process or your manager requires you to produce formal test specifications that must describe the procedure of each test, then you can easily auto-generate them.
Writing asynchronous tests is as easy as writing regular tests. The framework even allows you to run asynchronous and synchronous test code in the same test program.
Testing real-world applications is usually not done only with fully automated test scenarios. Most often, verification requires a mix of automated, semi-automated, and manual tests.
The framework allows you to unify your testing and provides uniform test reporting no matter what type of tests you need for your project by natively supporting the authoring of automated, semi-automated, and manual tests.
Native support for authoring parallel tests and executing them in parallel, with fine-grain control over what and where runs in parallel. Asynchronous tests are also supported and allow for thousands of concurrent tests to be run at the same time. Mixing parallel and asynchronous tests is also supported.
Combinatorial tests are supported by allowing you to define tests and steps that can take arguments, as well as allowing to easily and naturally define tests that check different combinations using TestSketches without writing any nested for-loops or calculating combinations beforehand.
In addition, a convenient collection of tools used for combinatorial testing is provided including calculation of Covering Arrays for pairwise and n-wise testing using the IPOG algorithm.
It uses everything-is-a-test approach that allows unified treatment of any code that is executed during testing. There is no second class test code. If test fails during setup, teardown or execution of one of its actions, the failure is handled identically. This avoids mixing analysis of why the test failed with test execution and results in a clean and uniform approach to testing.
It is built on top of a messaging protocol. This brings many benefits, including the ability to transform test output and logs into a variety of different formats as well as enable advanced parallel testing.
Test logs were designed to be easily stored in ClickHouse. Given that testing produces huge amounts of data, this integration brings test data analytics right to your fingertips.
Standard Grafana dashboards are available to visualize your test data stored in ClickHouse. Additional dashboards can be easily created in Grafana to highlight test results that are the most important for your project.
Avoids unnecessary abstraction layers, such as when test runners are decoupled from tests or the usage of behavior driven (BDD) keywords is always tied to Gherkin specifications. These abstractions, while providing some benefit, in most cases lead to more problems than solutions when applied to real-world projects.
Using Handbook
This handbook is a one-page document that you can search using standard
browser search (Ctrl-F).
For ease of navigation, you can always click any heading to go back to the table of contents.
✋ Try clicking
Using Handbookheading and you will see that the page will scroll up and the corresponding entry in the table of contents will be highlighted in red. This handy feature will make sure you are never lost!
There is also icon on the bottom right of the page to allow you to quickly scroll to the top.
Also, feel free to click on any internal or external references, as you can use your browser’s ⇦ back button to return to where you were.
✋ Try clicking Using Handbook link and then browser’s use ⇦ back button to return to the same scroll position in the handbook.
If you find any errors or would like to add documentation for something that is still not documented, then submit a pull request with your changes to handbook source file.
Supported Environment
✋ Known to run on other systems such as MacOS.
Installation
You can install the framework using pip3
1 | pip3 install testflows |
or from sources
1 | git clone https://github.com/testflows/TestFlows.git |
Upgrading
If you already have ![]() installed, you can upgrade it to the latest version
using the
installed, you can upgrade it to the latest version
using the --upgrade option when executing pip3 install command.
1 | pip3 install --upgrade testflows |
Hello World
You can write an inline test scenario in just three lines.
1 | from testflows.core import Scenario |
and simply run it using python3 command.
1 | python3 ./test.py |
1 | Jun 28,2020 14:47:02 ⟥ Scenario Hello World! |
Defining Tests
You can define tests inline using the classical Step, Test, Suite, and Module test definition classes or using specialized keyword classes as Scenario, Feature, Module and the steps such as Background, Given, When, Then, But, By, And, and Finally.
In addition, you can also define sub-tests using Check test definition class or its flavours Critical, Major or Minor.
✋ You are encouraged to use the specialized keyword classes to greatly improve the readability of your tests and test procedures.
Given the variety of test definition classes above, fundamentally,
there are only four core Types of tests in ![]() .
The core Types are
.
The core Types are
and all other types are just a naming variation of one of the above with the following mapping or are special types
- Module
- Suite
- Test
- Step
- Sketch (special)
- Combination (special)
- Outline (special)
- Iteration (special)
- RetryIteration (special)
see Types for more information.
Inline
Inline tests can be defined anywhere in your test program by using Test Definition Classes above. Because all test definition classes are context managers, therefore they must be used using the with statement or async with for asynchronous tests that leverage Python‘s asyncio module.
1 | with Module("My test module"): |
Decorated
For re-usability, you can also define tests using the TestStep, TestBackground, TestCase, TestCheck, TestCritical, TestMajor, TestMinor, TestSuite, TestFeature, TestModule, TestOutline, and TestSketch test function decorators.
For example,
1 |
|
Similarly to how class method‘s take an instance of the object as the first argument,
test functions wrapped with test decorators take an instance of the current test as the first argument
and therefore, by convention, the first argument is always named self.
Calling Decorated Tests
✋ All arguments to tests must be passed using keyword arguments.
For example,
1 | scenario(action="driving") |
Use a test definition class to run another test as
1 | Scenario(test=scenario)(action="running") |
where the test is passed as the argument to the test parameter.
If the test does not need any arguments, use a short form by passing
the test as the value of the run parameter.
1 | Scenario(run=scenario) |
✋ Use the short form only when you don’t need to pass any arguments to the test.
This will be equivalent to
1 | Scenario(test=scenario)() |
You can also call decorated tests directly as
1 | scenario(action="swimming") |
Note that scenario() call will only create its own Scenario if and only if it is
running within a parent that has a higher test Type such as Feature or Module.
However, if you call it within the same test Type then it will not create its own Scenario but will run simply as a function within the scope of the current test.
For example,
1 | with Scenario("My scenario"): |
will run in the scope of My scenario where self will be an instance of the
1 | Scenario("My scenario") |
but
1 | with Feature("My feature"): |
will create its own test.
Running Tests
Top level tests can be run using either python3 command or directly if they are made executable.
For example, with a top level test defined as
1 | from testflows.core import Test |
you can run it with python3 command as follows
1 | python3 test.py |
or we can make the top level test executable and defined as
1 | #!/usr/bin/python3 |
and then we can make it executable with
1 | chmod +x test.py |
allowing us to execute it directly as follows.
1 | ./test.py |
Writing Tests
With ![]() you actually write test programs, not just tests. This means
that the Python source file that contains Top Level Test can be run directly if
it is made executable and has
you actually write test programs, not just tests. This means
that the Python source file that contains Top Level Test can be run directly if
it is made executable and has #!/usr/bin/env python3
or using python3 command.
✋ Note thatonly allows one top level test in your test program.
See Top Level Test.
Writing tests is actually very easy, given that you are in full control of your test program. You can either define inline tests anywhere in your test program code or define them separately as test decorated functions.
An inline test is defined using the with statement and one of the Test Definition Classes. The choice of which test definition class you should use depends only on your preference. See Defining Tests.
The example from the Hello World shows an example of how an inline test can be easily defined.
1 | #!/usr/bin/env python3 |
The same test can be defined using the TestScenario decorated function. See Decorated Tests.
1 | #!/usr/bin/env python3 |
✋ Note that if the code inside the test does not raise any exceptions and does notexplicitly set test result it is considered as passing and will have OK result.
In the above example, the Hello World is the Top Level Test and the only test
in the test program.
✋ Note that instead of just having
passyou could add any code you want.
The Hello World test will pass if no exception is raised in the
with block otherwise it will have a Fail or Error result. Fail result is set
if code raises AssertionError any other exceptions will result in Error.
Let’s add a failing assert to Hello World test.
1 | from testflows.core import Scenario |
The result will be as follows.
1 | python3 hello_world.py |
1 | Nov 03,2021 17:09:17 ⟥ Scenario Hello World! |
Now, let’s raise some other exception like RuntimeError to see Error result.
1 | from testflows.core import Scenario |
1 | python3 hello_world.py |
1 | Nov 03,2021 17:14:10 ⟥ Scenario Hello World! |
Flexibility in Writing Tests
this is what makes it adaptable to your testing projects at hand.
Let’s look at an example of how to test the functionality
of a simple add(a, b) function.
✋ Note that this is just a toy example used for demonstration purposes only.
1 | from testflows.core import * |
Now you can put the code above anywhere you want. Let’s move it into a function. For example,
1 | from testflows.core import * |
We can also decide that we don’t want to use Feature and Scenario in this case but you’d like to use Scenario that has multiple Examples with test steps such as When and Then.
1 | from testflows.core import * |
The test code seems to be redundant, so we could move the When and Then steps into
a function check_add(a, b, expected) that can be called with different parameters.
1 | from testflows.core import * |
We could actually define all examples we want to check up-front and generate Example steps on the fly depending on how many examples we want to check.
1 | from testflows.core import * |
We could modify the above code and use Examples instead of our custom list of tuples.
1 | from testflows.core import * |
Another option is to switch to using decorated tests. See Decorated Tests.
Let’s move inline Scenario into a decorated TestScenario function with Examples and create Examples for each example that we have.
1 | from testflows.core import * |
We could also get rid of the explicit for loop over examples by using Outline with Examples.
1 | from testflows.core import * |
The Outline with Examples turns out to be the exact fit for the problem.
However, there are many cases where you would want to have choice, and ![]() provides the flexibility you need to author your tests in the way that fits best for you.
provides the flexibility you need to author your tests in the way that fits best for you.
Using Test Steps
When writing tests, it is best practice to break the test procedure
into individual test Steps. While using ![]() you can write
tests without explicitly defining Steps it is not recommended.
you can write
tests without explicitly defining Steps it is not recommended.
Breaking tests into steps has the following advantages:
- improves code structure
- results in a self documented test code
- significantly improves test failure debugging
- enables auto generation of test specifications
Structuring Code
Using test Steps helps structure test code. Any test inherently implements a
test procedure, and the procedure is usually described by a set of steps.
Therefore, it is natural to structure tests in the form of a series of individual
Steps. In ![]() test Steps are defined and used just like Tests
or Scenarios as Steps also have results just like Tests.
test Steps are defined and used just like Tests
or Scenarios as Steps also have results just like Tests.
Test Steps can either be defined inline or using TestStep function decorator, with the combination of both being the most common.
For example, the following code clearly shows that by identifying steps such as setup, action, and assertion, the structure of test code is improved.
1 | from testflows.core import * |
In many cases, steps themselves can be reused between many different tests. In this case, defining steps as decorated functions helps to make them reusable.
For example,
1 | from testflows.core import * |
The Steps above just like Tests can be called directly (not recommended) as follows:
1 |
|
The best practice, however, is to wrap calls to decorated test steps with inline
Steps which allows you to clearly give each Step a proper name in the context
of the specific test scenario as well as allows to specify a detailed description
when necessary.
For example,
1 |
|
✋ Note that because decorated test steps are being called within a Step these calls are similar to just calling a function, which is another advantage of wrapping calls with inline steps. This means that return value from the decorated test step can be received just like from a function:
2
3
4
5
6
7
8
9
def do_something(self):
return "hello there"
def my_scenario(self):
with When("I do something",
description="""detailed description if needed"""):
value = do_something() # value will be set to "hello there"
Self Documenting Test Code
Using test Steps results in self documented test code. Take another look at this example.
1 |
|
It is clear to see that explicitly defined Given, When, and Then steps
when given proper names and descriptions make reading test code
a pleasant experience as the test author has a way to clearly communicate
the test procedure to the reader.
The result of using test Steps is a clear, readable, and highly maintainable
test code. Given that each Step produces corresponding messages in the test output, it forces
test maintainers to ensure Step names and descriptions are
maintained accurate over the lifetime of the test.
Improved Debugging of Test Fails
Using test Steps helps with debugging test fails as you can clearly see at which Step of the test procedure the test has failed. Combined with the clearly identified test procedure it becomes much easier to debug any test fails.
For example,
1 | from testflows.core import * |
Running the test program above results in the following output using the default nice
format.
1 | Nov 12,2021 10:56:17 ⟥ Scenario my scenario |
If we introduce a fail in the When step, we can see that it will be easy to see at which point in the test procedure the test is failing.
1 |
|
1 | Nov 12,2021 10:58:02 ⟥ Scenario my scenario |
✋ Note that the failing test result always
bubbles upall the way to the Top Level Test and therefore it might seem that the output is redundant. However, this allows for the failure to be examined just by looking at the result of the Top Level Test.
Auto Generation of Test Specifications
When tests are broken up into Steps generating test specifications is very easy.
For example,
1 | from testflows.core import * |
when executed with short output format highlights the test procedure.
1 | Scenario my scenario |
If you save the test log using --log test.log option, then you can also use tfs show procedure command to
extract the procedure of a given test within a test program run.
1 | cat test.log | tfs show procedure "/my scenario" |
1 | Scenario my scenario |
Full test specification for a given test program run can be obtained
using tfs report specification command.
1 | cat test.log | tfs report specification | tfs document convert > specification.html |
Test Flow Control
The control of the Flow of tests allows you to precisely
define the order of test execution. ![]() allows you
to write complete test programs, and therefore the order of executed tests
is defined in your Python test program code explicitly.
allows you
to write complete test programs, and therefore the order of executed tests
is defined in your Python test program code explicitly.
For example, the following test program defines decorated tests
testA, testB, and testC which are executed in the regression() module
in the testA -> testB -> testC order.
1 | from testflows.core import * |
It is trivial to see that given that the order or test execution (Flow) is explicitely
defined in regression() we could easily change it from testA -> testB -> testC to
testC -> testA -> testB.
1 |
|
Conditional Test Execution
Conditional execution can be added to any explictely defined test Flow using standard Python Flow Control Tools using if, while, and for statements.
For example,
1 |
|
will execute testA and only proceed to run other tests if its result is not Fail otherwise
only testA will be executed. If result of testA is not Fail then
we run testB 3 times, and testC gets executed indefinitely until its result is OK.
Creating Automatic Flows
When precise control over test Flow is not necessary, you can easily define a list of tests to be executed in any way you might see fit, including using a simple list.
For example,
1 | # list of all tests |
For such simple cases, you can also use loads() function. See Using loads().
The loads() function allows you to create a list of tests of the specified type from either the current or some other module.
For example,
1 |
|
Here is an example of loading tests from my_project/tests.py module,
1 |
|
The list of tests can be randomized or ordered, for example, using ordered() function or Python‘s sorted function.
✋ You could also write Python code to load your list of tests from any other source such as a file system, database, or API endpoint, etc.
Setting Test Results Explicitly
A result of any test can be set explicitly using the following result functions:
- fail() function for Fail
- err() function for Error
- skip() function for Skip
- null() function for Null
- ok() function for OK
- xfail() function for XFail
- xerr() function for XError
- xnull() function for XNull
- xok() function for XOK
Here are the arguments that each result function can take. All arguments are optional.
messageis used to set an optional result messagereasonis used to set an optional reason for the result. Usually, it is only set for crossed out results such as XFail, XError, XNull and XOK to indicate the reason for the result being crossed out such as a link to an opened issuetestargument is usually not passed, as it is set to the current test by default. See current() function.
1 | ok(message=None, reason=None, test=None) |
These functions raise an exception that corresponds to the appropriate result class and therefore, unless you explicitly catch the exception, the test stops at the point at which the result function is called.
For example,
1 | from testflows.core import * |
You can also raise the result explicitly.
For example,
1 | from testflows.core import * |
Fails of Specific Types
![]() does not support adding types to the Fails but
the fail() function takes an optional
does not support adding types to the Fails but
the fail() function takes an optional type argument that takes
one of the Test Definition Classes which will be used to create a sub-test
with the name specified by the message and failed with the specified
reason.
The original use case is to provide a way to separate fails of Checks into Critical, Major and Minor without explicitly defining Critical, Major, or Minor sub-tests.
For example,
1 | from testflows.core import * |
The above code is equivalent to the following.
1 | from testflows.core import * |
Working With Requirements
Requirements must be at the core of any enterprise QA process. There exist numerous proprietary and complex
systems for handling requirements. This complexity is usually not necessary,
and ![]() provides a way to work with requirements just like with code
and leverage the same development tools to enable easy linking of requirements to your tests.
provides a way to work with requirements just like with code
and leverage the same development tools to enable easy linking of requirements to your tests.
In general, when writing requirements, you should think about how they will be tested. Requirements can either be high level or low level. High level requirements are usually verified by Features or Modules and low level requirements by individual Tests or Scenarios.
Writing untestable requirements is not very useful. Keep this in mind during your software testing process.
When writing requirements, you should be thinking about tests or test suites that would verify them, and when writing tests or test suites, you should think about which requirements they will verify.
The ideal requirement to test a relationship is one-to-one. Where one requirement
is verified by one test. However, in practice, the relationship can be
one-to-many, many-to-one, and many-to-many, and ![]() supports
all of these cases.
supports
all of these cases.
In many cases, don’t be afraid to modify and restructure your requirements once you start writing tests. It is natural to refactor requirements during test development process that helps better align requirements to tests and vice versa.
Writing requirements is hard, but developing enterprise software without requirements is even harder.
Requirement Documents
Working with requirements just like with code is very convenient, but it does not necessarily mean that we need to write requirements as Python code.
Requirements form documents such as SRS (Software Requirements Specification) where, in addition to the requirements, you might find additional sections such as introductions, diagrams, references, etc. Therefore, the most convenient way to define requirements is inside a document.
![]() allows you to write requirements as a Markdown
document that serves as the source of all the requirements. The document is the source
and is stored just like code in the source control repository such as Git.
This allows the same process to be applied to requirements as to the code.
For example, you can use the same review process and the same tools. You also receive full
traceability of when and who defined the requirement and keep track of any changes
just like for your other source files.
allows you to write requirements as a Markdown
document that serves as the source of all the requirements. The document is the source
and is stored just like code in the source control repository such as Git.
This allows the same process to be applied to requirements as to the code.
For example, you can use the same review process and the same tools. You also receive full
traceability of when and who defined the requirement and keep track of any changes
just like for your other source files.
For example, a simple requirements document in Markdown can be defined as follows.
requirements.md
2
3
4
5
6
7
8
9
10
11
12
13
14
# Software Requirements Specification
## Introduction
This software requirements specification covers the behavior of the standard
Unix `ls` utility.
## Requirements
### RQ.SRS001-CU.LS
version: 1.0
The [ls](#ls) utility SHALL list the contents of a directory.
The above document serves as the source of all the requirements and can be
used to generate corresponding Requirement class objects that can be linked with tests
using tfs requirements generate command. See Generating Requirements Objects.
Each requirement is defined as a heading that starts with RQ. prefix and contains
attributes such as version, priority, group, type and uid defined
on the following line, which must be followed by an empty line.
1 | ### RQ.SRS001-CU.LS |
Only the version attribute is always required, and the others are optional.
The version attribute allows for tracking material changes to the requirement over
lifetime of the product and makes sure the tests get updated when a requirement has been
updated to a new version.
Any text found before the next section is considered to be the description of the requirement.
1 | ### RQ.SRS001-CU.LS |
Here is an example where multiple requirements are defined.
1 | ### RQ.SRS001-CU.LS |
✋ Except for the basic format to define the requirements described above, you can structure and organize the document in any way that is the most appropriate for your case.
Each requirement must be given a unique name. The most common convention
is to start with the SRS number as a prefix, followed by a dot separated
name. The . separator serves to implicitly group the requirements.
It is usually best to align these groups with the corresponding document sections.
For example, we can create Options section where we would add requirements
for the supported options. Then all the requirements in this section would have
RQ.SRS001-CU.LS.Options. prefix.
1 | ### Options |
✋ Names are usually preferred over numbers to facilitate the movement of requirements between different parts of the document.
Generating Requirement Objects
Requirement class objects can be auto generated from the Markdown requirements source files
using tfs requirements generate command.
1 | tfs requirements generate -h |
1 | usage: tfs requirements generate [-h] [input] [output] |
For example, given requirements.md file having the following content.
requirements.md
2
3
4
5
6
7
8
9
10
11
12
13
14
# Software Requirements Specification
## Introduction
This software requirements specification covers the behavior of the standard
Unix `ls` utility.
## Requirements
### RQ.SRS001-CU.LS
version: 1.0
The [ls](#ls) utility SHALL list the contents of a directory.
You can generate requirements.py file from it using the following command.
1 | cat srs.md | tfs requirements generate > requirements.py |
The requirements.py will have the following content.
1 | # These requirements were auto generated |
For each requirement, a corresponding Requirement class object will be defined in addition to the Specification class object that describes the full requirements specification document.
1 | SRS001_ls_Unix_Command_Utility = Specification( |
The objects defined in the requirements.py can now be imported into test
source files and used to link with tests.
Linking Requirements
Once you have written your requirements in a Markdown document as described in Requirements As Code
and have generated Requirement class objects from the requirements source file using tfs requirements generate
command as described in Generating Requirements Objects
you can link the requirements to any of the tests by either setting
requirements attribute of the inline test or using Requirements
decorator for decorated tests.
For example,
1 | from requirements import RQ_SRS001_CU_LS |
The requirements argument takes a list of requirements, so you can link
any number of requirements to a single test.
Instead of passing a list, you can also pass Requirements object directly as follows,
1 | from requirements import RQ_SRS001_CU_LS |
where Requirements can be passed one or more requirements.
✋ Note that when linking requirements to test you should always call the requirement with the version that the test is verifying. If the version does not match the actual requirement version
RequirementErrorexception will be raised. See Test Requirements.
For decorated tests, Requirements class can also act as a decorator.
For example,
1 | from requirements import RQ_SRS001_CU_LS |
Linking Specifications
When generating requirements, in addition to the Requirement class objects created for each requirement, a Specification class object is also generated that describes the whole requirements specification document. This object can be linked to higher level tests so that a coverage report can be easily calculated for a specific test program run.
To link Specification class object to a test, either use specifications parameter for inline tests or Specifications decorator for decorated tests.
✋ Specifications are usually linked to higher level tests such as Feature, Suite, or Module.
For example,
1 | from requirements import SRS001_ls_Unix_Command_Utility |
One or more specifications can be linked.
Instead of passing a list, you can also pass Specifications object directly as follows,
1 | from requirements import SRS001_ls_Unix_Command_Utility |
✋ Note that Specification class object call also be called with a specific version, just like Requirement class objects.
If a higher level test is defined using a decorated function, then you can use Specifications decorator.
For example,
1 | from requirements import SRS001_ls_Unix_Command_Utility |
Attributes of Decorated Tests
You can set attributes for decorated tests using different decorator classes
such as Flags class to set test flags, Name class to set test name, Examples class
to set examples etc.
For example,
1 |
|
When creating a test based on a decorated test, the attributes of the test get preserved unless you override them explicitly.
For example,
1 | # execute `test()` using a Scenario that will have |
However, if you call a decorated test within a test of the same type, then the attributes of the parent test are not changed in any way as the test is executed just like a function.
1 | with Scenario("my test"): |
Overriding Attributes
You can override any attributes of a decorated test by explicitly creating a test
that uses it as a base using the test parameter, or the run parameter if there is no need to pass
any arguments to the test, and define any new values of the attributes as needed.
For example, we can override the name and flags attributes of a decorated
test() while not modifying examples or any other attributes as follows:
1 | Scenario(name="my new name", flags=PAUSE_BEFORE, test=test)(x=1, y=1, result=2) |
✋ The
testparameter sets the decorated test to be the base for the explicitly definedScenario.
If we also want to set custom examples, you could do it as follows:
1 | Scenario(name="my new name", flags=PAUSE_BEFORE, |
Similarly, any other attribute of the scenario can be set. If the same attribute is set already for the decorated test then the value is overwritten.
Modifying Attributes
If you don’t want to completely override the attributes of the decorated test then you need to explicitly modify them by accessing the original values of the decorated test.
Any set attributes of the decorated test can be accessed as the attribute of the decorated test object. For example,
1 | from testflows.core import * |
Use standard getattr() function to check if a particular attribute is set and if not then use the default value.
For example,
1 | Scenario("my new test", flags=Flags(getattr(test, "flags", None)) | PAUSE_BEFORE, test=test)(x=1, y=1, result=2) |
adds PAUSE_BEFORE flag to the initial flags of the decorated test.
✋ Note that you don’t want to modify the original attributes but instead you should always create a new object based on the initial attribute value.
Here is an example of how to add another example to existing examples
1 | Scenario("my new test", examples=Examples( |
Top Level Test
Because a Flow of tests can be represented as a rooted Tree, a test program exits on completion of the top level test. Therefore, any code that is defined after the top level test will not be executed.
1 | with Module("module"): |
✋ Top level test can’t be an asyncrounous test. See Async Tests.
Renaming Top Test
Top level test name can be changed using the –name command line argument.
1 | --name name test run name |
✋ Changing name of the top level test is usually not recommended as you can break any test name patterns that are not relative. For example, this can affect xfails, ffails, etc.
For example,
test.py
2
3
4
5
with Module("regression"):
with Scenario("my test"):
pass
1 | python3 test.py --name "new top level test name" |
1 | Sep 25,2021 8:55:18 ⟥ Module new top level test name |
Adding Tags to Top Test
On the command line, tags can be added to Top Level Test using –tag option. One or more tags can be specified.
1 | --tag value [value ...] test run tags |
For example,
test.py
2
3
4
5
with Module("regression"):
with Scenario("my test"):
pass
1 | python3 test.py --tag tag1 tag2 |
1 | Sep 25,2021 8:56:58 ⟥ Module regression |
Adding Attributes to Top Test
Attributes of the Top Level Test can be used to associate important information with your test run. For example, common attributes include tester name, build number, CI/CD job id, artifacts URL and many others.
✋ These attributes can be used extensively when filtering test runs in test results database.
On the command line, attributes can be added to Top Level Test using –attr option. One or more attributes can be specified.
1 | --attr name=value [name=value ...] test run attributes |
For example,
test.py
2
3
4
5
with Module("regression"):
with Scenario("my test"):
pass
1 | python3 top_name.py --attr build=21.10.1 tester="Vitaliy Zakaznikov" job_id=4325432 job_url="https://jobs.server.com/4325432" |
1 | Sep 25,2021 9:04:11 ⟥ Module regression |
Custom Top Test Id
By default Top Level Test test id is generated automatically using [UUIDv1]. However, if needed, you can specify custom id value using –id test program option.
✋ Specifying Top Level Test id should only be done by advanced users as each test run must have a unique id.
In general, the most common use case when you need to specify custom –id
is when you need to know Top Level Test id before running your test program.
Therefore, you would generate [UUIDv1] externaly using for example uuid utility
1 | uuid |
1 | 52da6a26-1e54-11ec-9d7b-cf20ccc24475 |
and passing the generated value to your test program.
For example, give the following test program
test.py
2
3
4
with Test("my test"):
pass
if it is executed without –id you can check top level test id by looking at raw output
messages and looking at test_id field.
1 | python3 id.py -o raw |
Now if you specify –id then you will see that test_id field of each message
will contain the new id.
1 | python3 id.py -o raw --id 112233445566 |
1 | {"message_keyword":"PROTOCOL",...,"test_id":"/112233445566",...} |
Test Program Tree
Executing any ![]() test program results in a Tree. Below is a
diagram that depicts a simple test program execution Tree.
test program results in a Tree. Below is a
diagram that depicts a simple test program execution Tree.
🔎 Test Program Tree
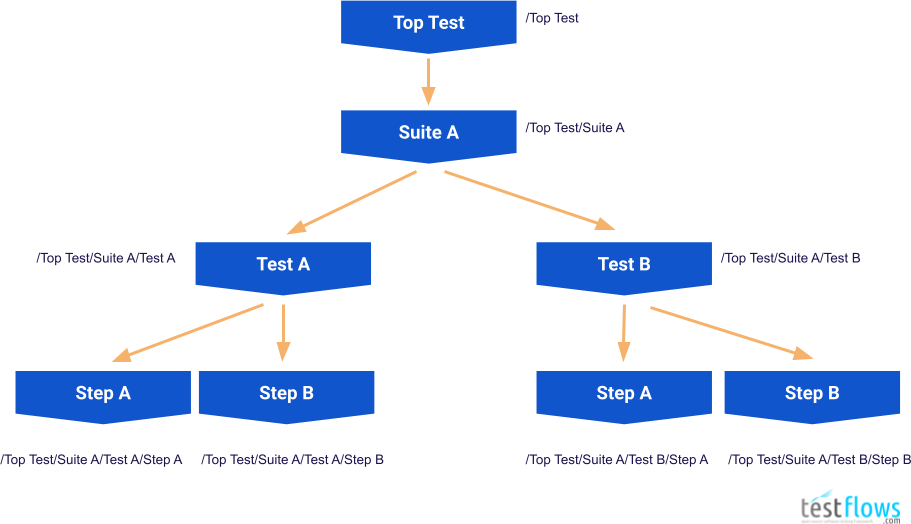
During test program execution, when all tests are executed sequentially, the Tree is traversed in a depth first order.
The order of execution of tests shown is the diagram above is as follows
- /Top Test
- /Top Test/Suite A
- /Top Test/Suite A/Test A/
- /Top Test/Suite A/Test A/Step A
- /Top Test/Suite A/Test A/Step B
- /Top Test/Suite A/Test B/
- /Top Test/Suite A/Test B/Step A
- /Top Test/Suite A/Test B/Step B
and this order of execution forms the Flow of the test program. This Flow can also be shown graphically as in the diagram below where depth first order of execution is highlighted by the magenta colored arrows.
🔎 Test Program Tree Traversal (sequential)
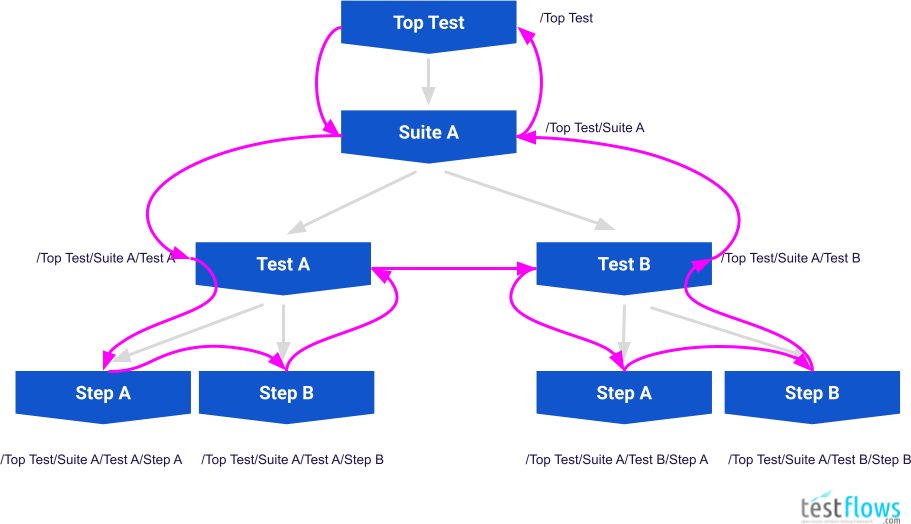
When dealing with test names when Filtering Tests it is best
to keep the diagram above in mind to help visualize and understand how ![]() works.
works.
Logs
The framework produces LZMA compressed logs that contains JSON encoded messages. For example,
1 | {"message_keyword":"TEST","message_hash":"ccd1ad1f","message_object":1,"message_num":2,"message_stream":null,"message_level":1,"message_time":1593887847.045375,"message_rtime":0.001051,"test_type":"Test","test_subtype":null,"test_id":"/68b96288-be25-11ea-8e14-2477034de0ec","test_name":"/My test","test_flags":0,"test_cflags":0,"test_level":1,"test_uid":null,"test_description":null} |
Each message is a JSON object. Object fields depend on the type of message that is specified by the message_keyword.
Logs can be decompressed using either the standard xzcat utility
1 | xzcat test.log |
or tfs transform decompress command
1 | cat test.log | tfs transform decompress |
Saving Log File
Test log can be saved into a file by specifying -l or --log option when running the test. For example,
1 | python3 test.py --log test.log |
Transforming Logs
Test logs can be transformed using tfs transform command. See tfs transform --help
for a detailed list of available transformations.
nice
The tfs transform nice command can be used to transform test log into a nice output format which the default output
used for the stdout.
For example,
1 | cat test.log | tfs transform nice |
1 | Jul 04,2020 19:20:21 ⟥ Module filters |
short
The tfs transform short command can be used to transform test log into a short output format that contains test procedures
and test results.
For example,
1 | cat test.log | tfs transform short |
1 | Module filters |
slick
The tfs transform slick command can be used to transform test log into a slick output format that contains only test names
with results provided as icons in front of the test name. This output format is very concise.
For example,
1 | cat test.log | tfs transform slick |
1 | ➤ Module filters |
dots
The tfs transform dots command can be used to transform test log into a dots output format, which outputs dots
for each executed test.
For example,
1 | cat test.log | tfs transform dots |
1 | ......................... |
raw
The tfs transform raw command can be used to transform a test log into a raw output format that contains raw JSON
messages.
For example,
1 | cat test.log | tfs transform raw |
1 | {"message_keyword":"PROTOCOL","message_hash":"489eeba5","message_object":0,"message_num":0,"message_stream":null,"message_level":1,"message_time":1593904821.784232,"message_rtime":0.001027,"test_type":"Module","test_subtype":null,"test_id":"/ee772b86-be4c-11ea-8e14-2477034de0ec","test_name":"/filters","test_flags":0,"test_cflags":0,"test_level":1,"protocol_version":"TFSPv2.1"} |
compact
The tfs transform compact command can be used to transform a test log into a compact format that only contains
raw JSON test definition and result messages while omitting all messages for the steps.
It is used to create compact test logs used for comparison reports.
compress
The tfs transform compress command is used to compress a test log with LZMA compression algorithm.
decompress
The tfs transform decompress command is used to decompress a test log compressed with LZMA compression algorithm.
Creating Reports
Test logs can be used to create reports using tfs report command. See tfs report --help for a list of available reports.
Results Report
A results report can be generated from a test log using tfs report results command.
The report can be generated in either Markdown format (default) or JSON format
by specifying --format json option.
The report in Markdown can be converted to HTML using tfs document convert command.
1 | Generate results report. |
For example,
1 | cat test.log | tfs report results | tfs document convert > report.html |
Coverage Report
Requirements coverage report can be generated from a test log using tfs report coverage command. The report is created in Markdown
and can be converted to HTML using tfs document convert command. For example,
1 | Generate requirements coverage report. |
For example,
1 | cat test.log | tfs report coverage requirements.py | tfs document convert > coverage.html |
Metrics Report
You can generate metrics report using tfs report metrics command.
1 | Generate metrics report. |
Comparison Reports
A comparison report can be generated using one of the tfs report compare commands.
1 | Generate comparison report between runs. |
Compare Results
A results comparison report can be generated using tfs report compare results command.
1 | Generate results comparison report. |
Compare Metrics
A metrics comparison report can be generated using tfs report compare metrics command.
1 | Generate metrics comparison report. |
Specification Report
A test specification for the test run can be generated using tfs report specification command.
1 | Generate specifiction report. |
Test Results
Any given test will have one of the following results.
OK
Test has passed.
Fail
Test has failed.
Error
Test produced an error.
Null
Test result was not set.
Skip
Test was skipped.
XOK
OK result was crossed out. Result is considered as passing.
XFail
Fail result was crossed out. Result is considered as passing.
XError
Error result was crossed out. Result is considered as passing.
XNull
Null result was crossed out. Result is considred as passing.
Test Parameters
Test parameters can be used to set attributes of a test. Here is a list of most common parameters for a test:
✋ Test parameters are used to set attributes of a test. Not to be confused with the attributes which is just one of the attributes of the test (object), that can be specified using the
attributesparameter when calling or creating a test.
- name
- flags
- uid
- tags
- attributes
- requirements
- examples
- description
- xargs
- xfails
- xflags
- ffails
- repeats
- retries
- timeouts
- only
- skip
- start
- end
- only_tags
- skip_tags
- random
- limit
- args
✋ Most parameter names match the names of the attributes of the test which they set. For example, name parameter sets the
nameattribute of the test.
✋ Note that the Args decorator can be used to set values of any parameter of the test. However, many parameters have corresponding dedicated decorators available to be used instead.
When test is defined inline then parameters can be set right when a test definition class is instantiated.
The first parameter is always name which sets the name of the test. The other parameters are usually
specified using keyword arguments.
For example,
1 | with Scenario("My test", description="This is a description of an inline test"): |
Test Arguments
args
The args parameter is used to set the arguments of the test.
✋ Do not confuse the
argsparameter with the Args decorator. See the Args decorator for more details.
1 |
|
If test arguments are passed during the test call, then they will overwrite the args.
For example,
1 |
|
Args
The Args class can be used as a decorator to set any parameters of the test. This is especially useful when there is no dedicated decorator available for the parameter.
Each test parameter can be specified using a corresponding keyword argument.
1 |
For example, the Name decorator can be used to set the name parameter of the test, however, the same can be done using the Args decorator.
1 |
|
It can also be used to specify default values of test arguments by setting the args parameter
to a dictionary where the key is the argument name and the value is the argument’s value.
1 |
|
Naming Tests
You can set the name of any test either by setting the name parameter of the inline test
or using the Name decorator if the test is defined as a decorated function.
The name of the test can be accessed using the name attribute of the test.
Restricted Characters
✋ New behaviour starting with version >=
2.3.11
are considered restricted. Specifically, the following ASCII characters /"'$\[]*?:!.^+{}|()
are restricted and, in general, are not recommended to be used in
test names as they cause conflicts when used in bash, regex, or name patterns.
If the test program is launched with the --strict-names option, then the NameError exception is raised
for any test whose name contains one or more restricted character.
When test program is executed without the --strict-names option, ![]() will
automatically convert restricted characters to their UTF-8 replacements according to the following table:
will
automatically convert restricted characters to their UTF-8 replacements according to the following table:
| Restricted Character | Replacement Code | Replacement Rendered | Replacement Description | Replacement Reason |
|---|---|---|---|---|
/ |
U+2215 | ∕ |
DIVISION SLASH | path separator |
" |
U+FF02 | " |
FULLWIDTH QUOTATION MARK | bash |
' |
U+FF07 | ' |
FULLWIDTH APOSTROPHE | bash |
$ |
U+FE69 | ﹩ |
SMALL DOLLAR SIGN | bash / regex |
\ |
U+FE68 | ﹨ |
SMALL REVERSE SOLIDUS | bash |
[ |
U+FF3B | [ |
FULLWIDTH LEFT SQUARE BRACKET | pattern / regex |
] |
U+FF3D | ] |
FULLWIDTH RIGHT SQUARE BRACKET | pattern / regex |
* |
U+FF0A | * |
FULLWIDTH ASTERISK | pattern / regex |
? |
U+FE16 | ︖ |
PRESENTATION FORM FOR VERTICAL QUESTION MARK | pattern / regex |
: |
U+FE55 | ﹕ |
SMALL COLON | pattern |
! |
U+FE15 | ︕ |
PRESENTATION FORM FOR VERTICAL EXCLAMATION MARK | bash |
. |
U+2024 | ․ |
ONE DOT LEADER | regex |
^ |
U+02C4 | ˄ |
MODIFIED LETTER UP ARROWHEAD | regex |
+ |
U+FF0B | + |
FULLWIDTH PLUS SIGN | regex |
{ |
U+FF5B | { |
FULLWIDTH LEFT CURLY BRACKET | regex |
} |
U+FF5D | } |
FULLWIDTH RIGHT CURLY BRACKET | regex |
| |
U+2160 | Ⅰ |
ROMAN NUMERAL ONE | regex |
( |
U+FF08 | ( |
FULLWIDTH LEFT PARENTHESIS | regex |
) |
U+FF09 | ) |
FULLWIDTH RIGHT PARENTHESIS | regex |
For example,
1 | from testflows.core import * |
1 | $ python3 test.py |
The test name "/"'$\[]*?:!.^+{}|()" will be converted to ∕"'﹩﹨[]*︖﹕︕․˄+{}Ⅰ(.
Even though the original test name contained characters that were conflicting with pattern
special symbols, because of the replacements, you can easily copy-paste the name for the –only option without
worrying about any special character escaping and just adding the /* at the end.
1 | $ python3 test.py --only '/∕"'﹩﹨[]*︖﹕︕․˄+{}Ⅰ()/*' |
Executing the same test program with the --strict-names option will result in an error.
1 | $ python3 test.py --strict-names |
Using clean()
The clean() function, from the testflows.core.name module, can be used to convert restricted characters to their UTF-8 replacements.
This is needed, for example, when using test names that contain restricted characters in xfails.
1 | from testflows.core import * |
You can also skip the explicit testflows.core.name import and use the default name.clean reference.
1 | from testflows.core import * |
Using strict mode
Use the –strict-names test program option to force the strict names mode which disallows using any restricted characters
in the test names. Any test whose name contains one or more restricted characters will cause a NameError exception to be raised.
1 | from testflows.core import * |
1 | $ python3 test.py --strict-names |
name
The name parameter of the test can be use used to set the name of any inline test. The name parameter
must be passed a str which will define the name of the test.
✋ For all test definition classes the first parameter is always the name.
For example,
1 | with Test("My test") as test: |
Name
A Name decorator can be used to set the name of any test that is defined using a decorated function.
✋ The name of test defined using a decorated function is set to the name of the function if the Name decorator is not used.
For example,
1 |
|
or if the Name decorator is not used
✋ Note that any underscores will be replaced with spaces in the name of the test.
1 |
|
Test Flags
You can set the Test Flags of any test either by setting the flags parameter of the inline test
or using the Flags decorator if the test is defined as a decorated function.
The flags of the test can be accessed using the flags attribute of the test.
flags
The flags parameter of the test can be use used to set the flags of any inline test. The flags parameter
must be passed valid flag or multiple flags combined with binary OR opertor.
For example,
1 | with Test("My test", flags=TE) as test: |
Flags
A Flags decorator can be used to set the flags of any test that is defined using a decorated function.
For example,
1 |
|
Test Tags
You can add tags to any test either by setting tags parameter of the inline test
or using Tags decorator if the test is defined as a decorated function. The values of the tags can be accessed
using the tags attribute of the test.
tags
The tags parameter of the test can be used to set tags of any inline test. The tags parameter
can be passed either a list, tuple or a set of tag values. For example,
1 | with Test("My test", tags=("tagA", "tagB")) as test: |
Tags
A Tags decorator can be used to set tags of any test that is defined used a decorated function. For example,
1 |
|
Test Attributes
You can add attributes to any test either by setting attributes parameter of the inline test
or by using Attributes decorator if the test is defined as a decorated function. The values of the attributes can be accessed
using the attributes attribute of the test.
attributes
The attributes parameter of the test can be used to set attributes of any inline test. The attributes parameter
can be passed either a list of (name, value) tuples or Attribute class instances. For example,
1 | with Test("My test", attributes=[("attr0", "value"), Attribute("attr1", "value")] as test: |
Attributes
An Attributes decorator can be used to set attributes of any test that is defined used a decorated function. For example,
1 |
|
Test Requirements
You can add requirements to any test either by setting requirements parameter of the inline test
or by using Requirements decorator if the test is defined as a decorated function. The values of the requirements can be accessed
using the requirements attribute of the test.
✋
Requirementclass instances must always be called with the version number the test is expected to verify.RequirementErrorexception will be raised if version does not match the version of the instance.
requirements
The requirements parameter of the test can be used to set requirements of any inline test. The requirements parameter
must be passed a list of called Requirement instances. of the inline test
or using Requirements decorator if the test is defined as a decorated function. The values of the requirements can be accessed
using the requirements attribute of the test.
For example,
1 |
|
Requirements
A Requirements decorator can be used to set requirements attribute of any test that is defined using a decorated function.
The decorator must be called with one or more called Requirement instances. For example,
1 | RQ1 = Requirement("RQ1", version="1.0") |
Test Specifications
You can add specifications to higher level tests either by setting specifications parameter of the inline test
or using Specifications decorator if the test is defined as a decorated function. The values of the specifications can be accessed
using the specifications attribute of the test.
✋ Specification class instances may be called with the version number the test is expected to verify.
SpecificationErrorexception will be raised if the version does not match the version of the instance.
specifications
The specifications parameter of the test can be used to set specifications of any inline test. The specifications parameter
must be passed a list of Specification class object instances for the inline tests
or using Specifications decorator if the test is defined as a decorated function. The values of the specifications can be accessed
using the specifications attribute of the test.
For example,
1 | from requirements import SRS001 |
Specifications
A Specifications decorator can be used to set specifications attribute of a higher level test that is defined using a decorated function.
The decorator must be called with one or more Specification class object instances. For example,
1 | from requirements import SRS001 |
Test Examples
You can add examples to any test by setting examples parameter of the inline test
or using Examples decorator if the test is defined as a decorated function. The examples can be accessed
using the examples attribute of the test.
examples
The examples parameter of the test can be used to set examples of any inline test. The examples parameter
must be passed a table of examples, which can be defined using Examples class for an inline test
or using the same Examples class as a decorator if the test is defined as a decorated function.
The rows of the examples table can be accessed
using the examples attribute of the test.
✋ Usually, examples are used only with test outlines. Please see Outline for more details.
For example,
1 | with Test("My test", examples=Examples("col0 col1", [("col0_row0", "col1_row0"), ("col0_row1", "col1_row1")])) as test: |
Examples
An Examples decorator can be used to set examples attribute of any test that is defined using a decorated function
or used as an argument of the examples parameter for the test.
The Examples class defines a table of examples and should be passed a header and a list for the rows.
✋ Usually, examples are used only with test outlines. Please see Outline for more details.
For example,
1 |
|
Test XFails
You can specify test results to be crossed out, known as xfails for any test
either by setting xfails parameter of the inline test or by using XFails decorator
if the test is defined as a decorated function. See Crossing Out Results
for more information.
xfails
The xfails parameter of the test can be used to set xfails of any inline test. The xfails parameter
must be passed a dictionary of the form
1 | { |
where key pattern is a test pattern that matches one or more tests for which one
or more results can be crossed out that are specified by the list.
A list must contain one or more (result, "reason"[, when][, result_message]) tuples where
result shall be the result that you want to cross out, for example Fail,
the reason shall be a string that specifies a reason why this result is being
crossed out. You can also specify an optional when condition that shall be a function that
takes a current test object as the first and only argument and shall either return
True or False. The cross-out will only be applied if the when function returns True.
For a fine-grained control over which test results should be crossed out,
you can also specify result_message to select only results with a specific message.
It shall be a regex expression that will be used to match the result message
with DOTALL|MULTILINE flags set during matching.
If result_message is specified, then a test result will only be crossed out if a match is found.
✋ A reason for a crossed out result can be a URL such as for an issue in an issue tracker.
For example,
1 | with Suite("My test", xfails={"my_test": [(Fail, "needs to be investigated")]}): |
or
1 | Suite(run=my_suite, xfails={"my test": [Fail, "https://my.issue.tracker.com/issue34567"]}) |
✋ If the test
patternis not absolute, then it is anchored to the test where xfails is specified.
XFails
The XFails decorator can be used to set xfails attribute of any test that is defined using a decorated function
or used as an extra argument when defining a row for the examples of the test.
The XFails decorator takes a dictionary of the same form as the xfails parameter, where
you can also specify when and result_message arguments.
1 |
|
Test XFlags
You can specify flags to be externally set or cleared for any test by setting xflags parameter or using XFlags decorator
for decorated tests. See Setting or Clearing Flags.
xflags
The xflags parameter of the test can be used to set xflags of a test. The xflags parameter
must be passed a dictionary of the form
1 | { |
where key pattern is a test pattern that matches one or more tests for which
flags will be set or cleared. The flags to be set or cleared are
specified by a tuple of the form (set_flags, clear_flags[, when]) where the
first element specifies flags to be set, and the second element specifies
flags to be cleared. An optional when condition can be specified that shall be a function that
takes a current test object as the first and only argument and shall either return
True or False. If specified, the flags will only be set and cleared if
the when function returns True.
Here is an example to set TE flag and to clear the SKIP flag,
1 | with Suite("My test", xflags={"my_test": (TE, SKIP)}): |
or just set SKIP flag without clearing any other flag
1 | Suite(run=my_suite, xflags={"my test": (SKIP, 0)}) |
and multiple flags can be combined using the binary OR (|) operator.
1 | # clear SKIP and TE flags for "my test" |
✋ If the test
patternis not absolute then it is anchored to the test where xflags is being specified.
XFlags
The XFlags decorator can be used to set xflags attribute of any test that is defined using a decorated function
or used as an extra argument when defining a row for the examples of the test.
The XFlags decorator takes a dictionary of the same form as the xflags parameter.
1 |
|
Test XArgs
You can specify test parameters to be set externally by setting the xargs parameter or using the XArgs decorator for decorated tests. The xargs parameter can be used to set most test parameters externally when the parameter lacks a dedicated method to do it. For example, the xflags should be used instead of the xargs to externally set the flags of the test.
The following parameters can’t be set:
xargs
The xargs parameter of the test can be used to set most other parameters of the test. The xargs parameter must be passed a dictionary of the form
1 | { |
where key pattern is a test pattern that matches one or more tests for which
parameters will be set. An optional when condition can be specified that shall be a function that
takes a current test object as the first and only argument and shall either return
True or False. If specified, the parameters will only be set if
the when function returns True.
Here is an example of setting the TE flag,
1 | with Suite("My test", xargs={"my_test": ({"flags": TE},)}): |
but note that it is recommended to use xflags to set flags externally.
✋ If the test
patternis not absolute, then it is anchored to the test where the xargs is being specified.
XArgs
The XArgs decorator can be used to set the xargs attribute of any test that is defined using a decorated function
or used as an extra argument when defining a row for the examples of the test.
The XArgs decorator takes a dictionary of the same form as the xargs parameter. For example,
1 |
|
Test FFails
You can force the result, including Fail result, of any test by setting
ffails parameter or using FFails decorator
for decorated tests. See Forcing Results.
ffails
The ffails parameter of the test can be used to force any result of a test, including Fail while skipping the execution of its test body. The ffails parameter must be passed a dictionary of the form
1 | { |
where key pattern is a test pattern that matches one or more tests for which
the result will be set by force, and the body of the test will not be executed.
The forced result is specified by a two-tuple of the form (Result, reason) where the
first element specifies the force test result, such as Fail, and the second element specifies
the reason for forcing the result as a string.
For example,
1 | with Suite("My test", ffails={"my_test": (Fail, "test gets stuck")}): |
or
1 | Suite(run=my_suite, ffails={"my test": (Skip, "not supported")}) |
✋ If the test
patternis not absolute then it is anchored to the test where ffails is being specified.
FFails
The FFails decorator can be used to set ffails attribute of any test that is defined using a decorated function
or used as an extra argument when defining a row for the examples of the test.
The FFails decorator takes a dictionary of the same form as the ffails parameter.
1 |
|
The optional when function can also be specified.
1 | def version(*versions): |
Test Timeouts
You can set test timeouts using the timeouts parameter.
Timeouts
The Timeouts object can be either used as the value of the timeouts parameter or as a decorator that can be applied to any decorated test.
The Timeouts takes as an argument a list of objects that specify a timeout, either using the Timeout object directly or as a tuple of arguments that will be passed to it.
1 | [ |
The Timeouts decorator should be used when you want to specify more than one timeout.
✋ Even though more than one timeout can be specified, only the value with the smallest value will be the effective timeout.
1 |
|
For a single timeout, the Timeout decorator can be used instead.
Timeout
The Timeout object can be either used as one of the values in the list passed to the timeouts parameter or as a decorator that can be applied to any decorated test.
1 | Timeout(timeout, message=None, started=None, name=None) |
where
timeouttimeout in secmessagecustom timeout error message, default:Nonestartedstart time, default:None(set to the current test’s start time)namename, default:None
For example,
1 | with Test("my test", timeouts=[Timeout(10)]): |
or it can be used as a decorator as follows:
1 |
|
The when Condition
Some parameters support a when condition, specified as a function, as the last element.
If present, the when function is called before test execution.
The boolean result returned by the when function determines if the forced result is applied,
if the function returns True, or not, if it returns False.
The when function must take one argument, which is the instance of the test.
✋ The optional
whenfunction can define any logic that is needed to determine if some condition is met. Any callable that takes a current test object as the first and only argument that can be used.
Here is an example of using ffails with a when condition:
1 | def version(*versions): |
Specialized keywords
when writing your test scenarios, the framework encourages the usage of specialized keywords because they can provide the much-needed context for your steps.
The specialized keywords map to core Step, Test, Suite, and Module test definition classes as follows:
- Module is defined as a Module
- Suite is defined as a Feature
- Test is defined as a Scenario
- Step is defined as one of the following:
- Given is used define a step for precondition or setup
- Background is used define a step for a complex precondition or setup
- When is used to define a step for an action
- And is used as a continuation of the previous step
- By is used to define a sub-step
- Then is used to define a step for positive assertion
- But is used to define a step for negative assertion
- Finally is used to define a cleanup step
Semi-Automated and Manual Tests
Tests can be semi-automated and include one or more manual steps, or be fully manual.
✋ It is often common to use input() function to prompt for input during execution of semi-automated or manual tests. See Reading Input.
Semi-Automated Tests
Semi-automated tests are tests that have one or more steps with the MANUAL flag set.
✋ MANUAL test flag is propagated down to all sub-tests.
For example,
1 | from testflows.core import * |
When a semi-automated test is run, the test program pauses and asks for input for each manual step.
1 | Sep 06,2021 18:39:00 ⟥ Scenario my mixed scenario |
Manual Tests
A manual test is just a test that has MANUAL flag set at the test level. Any sub-tests, such as steps, inherit MANUAL flag from the parent test.
✋ Manual tests are best executed using manual output format.
For example,
1 | from testflows.core import * |
When a manual test is run, the test program pauses for each test step as well as to get the result of the test itself.
1 | Sep 06,2021 18:44:30 ⟥ Scenario manual scenario, flags:MANUAL |
Manual With Automated Steps
A test that has MANUAL flag could also include some automated steps, which can be marked as automated using AUTO flag.
For example,
1 | from testflows.core import * |
When the above example is executed, it will produce the following output that shows that the
result for /manual scenario/automated action was set automatically
based on the automated actions performed in this step.
1 | Oct 31,2021 18:24:53 ⟥ Scenario manual scenario, flags:MANUAL |
Test Definition Classes
Module
A Module can be defined using Module test definition class or TestModule decorator.
1 |
|
or inline as
1 | with Module("module"): |
Suite
A Suite can be defined using Suite test definition class or TestSuite decorator.
1 |
|
or inline as
1 | with Suite("My suite"): |
Feature
A Feature can be defined using Feature test definition class or TestFeature decorator.
1 |
|
or inline as
1 | with Feature("My feature"): |
Test
A Case can be defined using Test test definition class or TestCase decorator.
1 |
|
or inline as
1 | with Test("My testcase"): |
✋ Note that here the word
testis used to define a Case to match the most common meaning of the wordtest. When someone says they will run atestthey most likely mean they will run a test Case.
Scenario
A Scenario can be defined using Scenario test definition class or TestScenario decorator.
1 |
|
or inline as
1 | with Scenario("My scenario"): |
Check
A Check can be defined using Check test definition class or TestCheck decorator
1 |
|
or inline as
1 | with Check("My check"): |
and is usually used inside either Test or Scenario to define an inline sub-test
1 | with Scenario("My scenario"): |
Critical, Major, Minor
A Critical, Major, or Minor checks can be defined using Critical, Major or Minor test definition class, respectively, or similarly using TestCritical, TestMajor, TestMinor decorators
1 |
|
or inline as
1 | with Critical("My critical check"): |
and are usually used inside either Test or Scenario to define inline sub-tests.
1 | with Scenario("My scenario"): |
These classes are usually used for the classification of checks during reporting.
1 | 1 scenario (1 ok) |
Example
An Example can only be defined inline using Example test definition class. There is no decorator to define it outside of existing test. An Example is of a Test Type and is used to define one or more sub-tests. Usually, Examples are created automatically using Outlines.
1 | with Scenario("My scenario"): |
Outline
An Outline can be defined using Outline test definition class or TestOutline decorator. An Outline is a sub-type of a Test type but can you can change the type by passing it another Type or a Sub-Type such as Scenario or Suite etc.
However, because Outlines are meant to be called from other tests or used with Examples it is best to define an Outline using TestOutline decorator as follows.
1 | from testflows.core import * |
When Examples are defined for the Outline and an outline is called with no arguments from a test that is of a higher Type than the Type of outline itself, then when called, the outline will iterate over all the examples defined in the Examples table. For example,if you run the example above that executes the outline with no arguments, you will see that the outline iterates over all the examples in the Examples table, where each example, a row in the examples table, defines the values of the arguments for the outline.
1 | Jul 05,2020 18:16:34 ⟥ Scenario outline |
If we run the same outline with arguments, then the outline will not use the Examples but instead will use the argument values that were provided to the outline. For example,
1 | with Scenario("My scenario"): |
will produce the following output.
1 | Jul 05,2020 18:23:02 ⟥ Scenario My scenario |
Combination
A Combination is not meant to be used explicitly, and in most cases it is only used internally to represent each combination of a Sketch.
Sketch
A Sketch is defined using the TestSketch decorator. In most cases you should not use Sketch test definition class directly as it will not execute its Combinations. A Sketch is a sub-type of a type Test but you can specify a different type. For example, you can pass a specific Type or a Sub-Type such as Scenario, Suite, or Feature etc. when defining a TestSketch.
Because Sketchs are designed to execute different Combinations, one for each Combination defined by the either() function, it is best to define a Sketch only using a TestSketch decorator.
✋ TestSketch is designed to work with either() function that is used to define combination variables and their possible values.
For example,
1 | def add(a, b): |
The TestSketch above calls the add() function with different combinations of its a and b parameters.
The Sketch checks combinations when a argument is either 1 or 2, and b argument is either 2 or 3.
Therefore, the following combination patterns are covered:
pattern #0: add(1,2)pattern #1: add(1,3)pattern #2: add(2,2)pattern #3: add(2,3)
You can see this from the output of the test.
1 | Sep 21,2023 13:42:38 ⟥ Scenario my sketch |
See Using Sketches for more details.
Iteration
An Iteration is not meant to be used explicitly, and in most cases it is only used internally to implement test repetitions.
RetryIteration
A RetryIteration is not meant to be used explicitly and, in most cases, is only used internally to implement test retries.
Step
A Step can be defined using Step test definition class or TestStep decorator.
1 |
|
A TestStep can be made specific by passing it a specific [BBD] step Sub-Type.
1 |
|
A Step can be defined inline as
1 | with Step("step"): |
Given
A Given step is used to define preconditions or setup and is always treated as a mandatory step that can’t be skipped because MANDATORY flag will be set by default. It is defined using Given test definition class or using TestStep with Given passed as the Sub-Type.
1 |
|
or inline as
1 | with Given("I have something"): |
Background
A Background step is used to define a complex preconditions or setup, usually containing multiple Given‘s and can be defined using Background test definition class or TestBackground decorator. It is treated as a mandatory step that can’t be skipped.
1 |
|
or inline as
1 | with Background("My complex setup"): |
When
A When step is used to define an action within a Scenario. It can be defined using When test definition class or using TestStep decorator with When passed as the Sub-Type.
1 |
|
or inline as
1 | with When("I do some action"): |
And
An And step is used to define a step of the same Sub-Type as the step right above it. It is defined using And test definition class.
✋ It does not make sense to use TestStep decorator to define it, so always define it inline.
1 | with When("I do some action"): |
or
1 | with Given("I have something"): |
✋
TypeErrorexception will be raised if the And step is defined where it has no siblings. For example,
2
3
4
5
# TypeError exception will be raised on the next line
# and can be fixed by changing the `And` step into a `When` step
with And("I do something"):
passwith the exception being as follows.
✋
TypeErrorexception will also be raised if the Type of the sibling does not match the Type of the And step. For example,
2
3
4
5
6
7
pass
# TypeError exception will be raised on the next line
# and can be fixed by changing the `And` step into a `When` step
with And("I do something"):
passwith the exception being as follows.
By
A By step is usually used to define a sub-step using By test definition class.
1 | with When("I do something"): |
Then
A Then step is used to define a step that usually contains a positive assertion. It can be defined using Then test definition class or using TestStep decorator with Then passed as the Sub-Type.
1 |
|
or inline as
1 | with Then("I expect something"): |
But
A companion of the Then step is a But step and is used to define a step that usually contains a negative assertion. It can be defined using But test definition class or using TestStep decorator with But passed as the Sub-Type.
1 |
|
or inline as
1 | with But("I check something is not true"): |
Finally
A Finally step is used to define a cleanup step and is treated as a mandatory step that can’t be skipped because MANDATORY flag will be set by default.
It can be defined using Finally test definition class or using TestStep decorator with Finally passed as the Sub-Type.
1 |
|
or inline as
1 | with Finally("I clean up"): |
The TE flag is always set for Finally steps as multiple Finally steps can be defined back to back and the failure of a previous step should not prevent execution of other Finally steps that follow.
Concepts
The framework was implemented with the following concepts and definitions in mind. These definitions were used as a guideline to implement the test Tree hierarchy. While the implementation does not strictly enforce these concepts, users are encouraged to apply these definitions during the design of their tests.
Everything is a Test
The framework treats everything as a test, including setup and teardown.
Definitions
Test is
something that produces a result.
Flow is
a specific order of execution of Tests
Tree is
a rooted tree graph that results from the execution of a Flow
Step is
is a lowest level Test
Case is
a Test that is made up of one or more Steps
Suite is
is a Test that is made up of one or more Cases
Module is
a Test that is made up of one or more Suites
Types
The framework divides tests into the following Types from highest to the lowest
Children of each Type must be of the same Type or lower.
Sub-Types
The framework uses the following Sub-Types in order to provide more flexibility and implement specialized keywords
- Feature
- Scenario
- Example
- Check
- Critical
- Major
- Minor
- Background
- Given
- When
- Then
- And
- But
- By
- Finally
- Sketch (special)
- Combination (special)
- Outline (special)
- Iteration (special)
- RetryIteration (special)
Sub-Types Mapping
The Sub-Types have the following mapping to the core four Types
The following special types can be applied to any of the core four Types
- Outline (special)
- Sketch (special)
- Combination (special)
- Iteration (special)
- RetryIteration (special)
Command Line Arguments
You can add command line arguments to the top level test either by setting argparser parameter of the inline test or using ArgumentParser decorator if top test is defined as a decorated function.
argparser
The argparser parameter can be used to set a custom command line argument parser by passing it a function that takes parser as the first
parameter. This function will be called with an instance of argparse parser instance as the argument for the parser parameter.
The values of the command line arguments can be accessed using the attributes attribute of the test.
✋ Note that all arguments of the top level test become its
attributes.
For example,
1 | def argparser(parser): |
ArgumentParser
If Module is defined using a decorated function then ArgumentParser decorator can be used to set custom command line argument parser. The values of the custom command line arguments will be passed to the decorated function as test arguments and therefore the decorated function must take the first parameters with the same name as command line arguments.
For example,
1 | def argparser(parser): |
When custom command line argument parser is defined then the help messages obtained using -h or --help option will include
the description of the custom arguments. For example,
1 | python3 ./test.py |
1 | ... |
Filtering Tests By Name
![]() allows to control which tests to run during any
specific test program run using advanced test filtering patterns.
Test filters can be either specified in the code or controlled using command line
options.
allows to control which tests to run during any
specific test program run using advanced test filtering patterns.
Test filters can be either specified in the code or controlled using command line
options.
In both cases test filtering is performed by setting skips, onlys, skip_tags
and only_tags attributes of a test. These attributes are propagated down
to sub-tests as long as filtering pattern has a chance of matching
test name. Therefore, parent test filtering attributes, if specified,
always override the same attributes of any of its sub-tests if the parent test
filter is applicable to the sub-test and could match either the sub-test name
or any of the sub-test children names.
Test are filtered using a pattern.
The pattern is used to match test names and ![]() uses
unix-like file path patterns that support wildcards where
uses
unix-like file path patterns that support wildcards where
/is path level separator*matches anything (zero or more characters)?matches any single character[seq]matches any character in seq[!seq]matches any character not in seq:matches one or more characters only at the current path level
✋ Note that for a literal match, you must wrap the meta-characters in brackets where
[?]matches the character?.
It is important to remember that execution of test program results in a Tree where each test is node and test name being a unique path to this node in the Tree. The unix-like file path patterns work well because test program execution Tree is similar to the structure of a file system.
Filtering tests is then nothing but selecting which nodes in the tree should be selected and which shall be skipped. Filtering is performed by matching the pattern to the test name. See Test Program Tree.
Skipping a test then means that the body of the test is skipped along with the sub-tree that is below the corresponding test node.
When we want to include a test
it usually means that we also want to execute the test along with all the tests
that form the sub-tree below the coresponding test node and therefore
the pattern that indicates which tests should be included most of the time ends with /*.
For example,
/Top Test/Suite A/Test A/*pattern will match/Top Test/Suite A/Test Aand all its sub-tests which are/Top Test/Suite A/Test A/Step Aand/Top Test/Suite A/Test A/Step Bbecause they also match the specified pattern as it ends with/*where*matches any zero or more characters.
Internally ![]() converts all patterns into
regular expressions but these expressions become very complex and therefore
not practicle to be specified explicitely.
converts all patterns into
regular expressions but these expressions become very complex and therefore
not practicle to be specified explicitely.
Let’s see how test filtering can be specified either using command line or inside the test program code.
–only option
You can specify which tests you want to include in your test run using –only option. This option takes one or more test name patterns that if not matched will cause the test to be skipped.
1 | --only pattern [pattern ...] run only selected tests |
If you pass a relative pattern, any pattern that does not start with /,
then the pattern will be anchored to the top level test.
For example, pattern Suite A/* for the example below will become
/Top Test/Suite A/*.
Let’s practice. Given this example test program,
test.py
2
3
4
5
6
7
8
9
10
11
12
13
14
15
16
17
def my_scenario(self):
with Step("Step A"):
pass
with Step("Step B"):
pass
def my_suite(self):
Scenario("Test A", run=my_scenario)
Scenario("Test B", run=my_scenario)
with Module("Top Test"):
Suite("Suite A", run=my_suite)
Suite("Suite B", run=my_suite)
the following command will run only Suite A and its sub-tests.
1 | python3 test.py --only "Suite A/*" |
To select only running Test A in Suite A.
1 | python3 test.py --only "/Top Test/Suite A/Test A/*" |
To select running any test at second level that ends with letter B.
This will select every test in Suite B.
1 | python3 filtering.py --only "/Top Test/:B/*" |
To run only Test A in Suite A and Test B in Suite B.
1 | python3 test.py --only "/Top Test/Suite A/Test A/*" "/Top Test/Suite B/Test B/*" |
If you forget to specify /* at the end your test pattern then
tests that are not mandatory will be skipped.
1 | python3 test.py --only "/Top Test/Suite A/Test A" |
From the output below you can see that steps inside Test A which
are Step A and Step B are skipped as these tests don’t have
MANDATORY flag set.
2
3
4
5
6
Sep 27,2021 14:19:46 ⟥ Suite Suite A
Sep 27,2021 14:19:46 ⟥ Scenario Test A
3ms ⟥⟤ OK Test A, /Top Test/Suite A/Test A
6ms ⟥⟤ OK Suite A, /Top Test/Suite A
18ms ⟥⟤ OK Top Test, /Top Test
✋ Remember that tests with MANDATORY flag cannot be skipped and Given and Finally steps always have MANDATORY flag set.
If you want to see which tests where skipped you can specify –show-skipped option.
1 | python3 test.py --only "/Top Test/Suite A/Test A" --show-skipped |
–skip option
You can specify which tests you want to skip in your test run using –skip option. This option takes one of more test name patterns that if match will cause the test be skipped.
1 | --skip pattern [pattern ...] skip selected tests |
Skipping test means that a SKIP flag will be added to the test, the body of the test will not be executed and the result of the test will be set to Skip. By default, most output formats do not show Skipped tests and thus you must use –show-skipped option to see them.
Just like for –only option, if you pass a relative pattern, any pattern that does not start with /,
then the pattern will be anchored to the top level test.
For example, the pattern Suite A/* for the example below will become
/Top Test/Suite A/*.
✋ Remember that tests with MANDATORY flag cannot be skipped and Given and Finally steps always have MANDATORY flag set.
Here are a couple of examples that are based on the same example test program that is used in the –only option section above.
✋ Unlike for the –only option the patterns for –skip do not have to end with
/*as skipping a test automatically skips any sub-tests of the test being skipped.
To skip running Test A in Suite A.
1 | python3 test.py --skip "/Top Test/Suite A/Test A" |
To skip running any test at second level that ends with letter B.
1 | python3 filtering.py --skip "/Top Test/:B" |
Here is an example of combining –only option with –show-skipped option to show Skipped tests.
1 | python3 test.py --skip "/Top Test/Suite A/Test A" --show-skipped |
1 | ✔ [ Skip ] /Top Test/Suite A/Test A |
Now let’s skip Test A in either Suite A or Suite B.
1 | python3 test.py --skip "/Top Test/:/Test A" --show-skipped |
1 | ✔ [ Skip ] /Top Test/Suite A/Test A |
–only and –skip
You can combine selecting and skipping tests by specifying both –only and –skip options. See –only option and –skip option sections above.
When –only and –skip are specified at the same time the –only option is applied first and selects a list of tests that will be run. If –skip option is present then it can only filter down the selected tests.
✋ Remember that tests with MANDATORY flag cannot be skipped and Given and Finally steps always have MANDATORY flag set.
For example, using example test program found in –only option section
we can select to run Test A in either Suite A or Suite B but then
skip Test A in Suite B using –skip option as follows.
1 | python3 test.py --only "/Top Test/:/Test A" --skip "Suite B/Test A" |
1 | Passing |
As you can see from the output above the Suite B gets started but all its tests are skipped
as Test B did not match the pattern specified to the –only
and Test A was skipped by the –skip.
Filtering Tests in Code
In your test program you can filter child tests to control what tests are included or skipped
by setting only and skip test attributes.
only and skip Arguments
When test is defined inline you can explicitly set filtering using only and skip
arguments. These arguments either take a list of patterns or you can use
Onlys class or Skips class respectively.
1 | Onlys(pattern, ...) |
or
1 | Skips(pattern,...) |
✋ Onlys class or Skips class can also act as decorators to set
onlyandskipattributes of decorated tests. SeeOnlysandSkipsDecorators.
1 | with Scenario("my tests", only=[pattern,...], skip=[pattern,...]) |
or
1 | with Scenario("my tests", only=Onlys(pattern,...), skip=Skips(pattern,...)) |
For example,
1 | from testflows.core import * |
Onlys and Skips Decorators
You can also specify only and skip attributes of decorated tests
using Onlys class and Skips class that can act as decorators to
set only and skip attributes of a decorated test respectively.
1 |
or
1 |
For example,
1 |
|
Filtering Tests By Tags
In addition to filtering test by name you can also filter them by tags.
When you filter by tags, you must specify a type to indicate which test Types
should have the tag.
✋ Filtering test Steps by tags is not supported.
Tags Filtering type
The type can be one of the following:
testwill require all tests with Test Type to have the tagscenariois just an alias fortest
suitewill require all tests with Suite Type to have the tagfeatureis just an alias forsuite
modulewill require all tests with Module Type to have the taganywill require all test with either Test Type, Suite Type or Module Type to have the tag
--only-tags option
If you assign tags to your tests then –only-tags option can be used to select
only the tests that match a particular tag. This option takes values
of the form type:tag1 where type is used to specify a test type
of the tests that must have the specified tag.
If you want to select tests that must have more than one tag use type:tag1,tag2,... form.
1 | --only-tags type:tag,... [type:tag,... ...] run only tests with selected tags |
For example, you can select all tests with Suite Type that have tag A tag
as follows.
1 | python3 test.py --only-tags suite:"tag A" |
You can select all tests with Test Type that either have tag A OR tag B.
1 | python3 test.py --only-tags test:"tag A" test:"tag B" |
You can select all tests with Test Type that have both tag A AND tag B.
1 | python3 test.py --only-tags test:"tag A","tag B" |
You can select all tests with Test Type that must have either tag A OR (tag A AND tag B).
1 | python3 test.py --only-tags test:"tag A" test:"tag A","tag B" |
--skip-tags option
If you assign tags to your tests, then you can also use –skip-tags option to select
which tests should be skipped based on tests matching a particular tag.
Similar to –only-tags option, it also takes values
of the form type:tag where type is used to specify a test type
of the tests that must have the specified tags.
If you want to skip tests that must have more than one tag use type:tag1,tag2,... form.
1 | --skip-tags type:tag,... [type:tag,... ...] skip tests with selected tags |
For example, you can skip all tests with Suite Type that have tag A tag
as follows.
1 | python3 test.py --skip-tags suite:"tag A" |
You can skip all tests with Test Type that either have tag A OR tag B.
1 | python3 test.py --skip-tags test:"tag A" test:"tag B" |
You can skip all tests with Test Type that have both tag A AND tag B.
1 | python3 test.py --skip-tags test:"tag A","tag B" |
You can skip all tests with Test Type that must have either tag A OR (tag A AND tag B).
1 | python3 test.py --skip-tags test:"tag A" test:"tag A","tag B" |
Filtering by Tags in Code
In your test program, you can filter child tests by tags to control which tests are included or skipped
by setting only_tags and skip_tags test attributes.
only_tags and skip_tags Arguments
When test is defined inline you can explicitly set filtering by tags using only_tags and skip_tags
arguments. These arguments take OnlyTags class or SkipTags class object instances, respectively,
that provide a convenient way to set these filters.
For example,
1 | OnlyTags( |
or similarly
1 | SkipTags( |
✋ OnlyTags class or SkipTags class can also act as decorators to set
only_tagsandskip_tagsattributes of decorated tests. SeeOnlyTagsandSkipTagsDecorators.
1 | with Scenario("my tests", only_tags=OnlyTags(test=["tag1",("tag1","tag2"),...]), skip_tags=SkipTags(suite=["tag2",...]) |
OnlyTags and SkipTags Decorators
You can also specify only_tags and skip_tags attributes of the decorated tests
using OnlyTags class and SkipTags class that can act as decorators to
set only_tags and skip_tags attributes of a decorated test, respectively.
1 |
|
or similarly
1 |
|
For example,
1 |
|
Pausing Tests
When tests perform complex automated actions, it is often useful to pause a test either
right before it starts executing its body or right after its completion.
Pausing a test means that the test execution will be halted and input in the form
of pressing Enter will be requested from the user. This pause allows
time to manually examine the system under test as well as the test environment.
Pausing either before or after a test is controlled by setting either PAUSE_BEFORE or PAUSE_AFTER flags, respectively. You can also conditionally pause after test execution on passing or failing result using PAUSE_ON_PASS or PAUSE_ON_FAIL.
✋ PAUSE_BEFORE, PAUSE_AFTER, PAUSE_ON_PASS, and PAUSE_ON_FAIL flags can be applied to any test except the Top Level Test test. For Top Level Test test these flags are ignored.
Pausing Using Command Line
Most of the time, the most convenient way to pause a test program is to specify at which test, the program should pause using –pause-before, –pause-after, –pause-on-pass, and –pause-on-fail arguments.
These arguments accept one or more test names patterns. Any test name that matches the pattern except for the Top Level Test will be paused.
1 | --pause-before pattern [pattern ...] pause before executing selected tests |
For example, if we have the following test program.
pause.py
1 | from testflows.core import * |
Then, if we want to pause before executing the body of my step 1 and right after
executing my step 2 we can execute our test program as follows.
1 | python3 pause.py --pause-before "/my test/my step 1" --pause-after "/my test/my step 2" |
This will cause the test program to be halted twice, requesting Enter input
from the user to continue execution.
1 | Sep 25,2021 8:34:45 ⟥ Test my test |
Pausing In Code
You can explicitly specify PAUSE_BEFORE, PAUSE_AFTER, PAUSE_ON_PASS and PAUSE_ON_FAIL flags inside your test program.
For example,
1 | with Test("my test"): |
For decorated tests Flags decorator can be used to set these flags.
1 |
|
Using pause()
You can also use pause() function to explicitly pause the test during test program execution.
1 | pause(test=None) |
where
testthe test instance in which the test program will be paused, default: current test
For example,
1 | from testflows.core import * |
when executed the test program is paused.
1 | Nov 15,2021 17:31:58 ⟥ Scenario my scenario |
Using Contexts
Each test has context attribute for storing and passing state
to sub-tests. Each test has a unique object instance of Context class however,
context variables from the parent
can be accessed as long as the same context variable is not redefined by the current
test.
The main use case for using context is to avoid passing along common arguments
to sub-tests, and becuase contexts enable them to pass automatically.
Also, test clean up functions can be added to the current test using context.
See Cleanup Functions.
Here is an example of using context to store and pass state.
1 | from testflows.core import * |
and you can confirm this by running the test program above.
1 | Sep 24,2021 10:24:54 ⟥ Module regression |
✋ You should not modify parent’s context directly (
self.parent.context). Always set variables using the context of the current test, either by usingself.contextorcurrent().context.
Using in Operator
You can use in operator to check if a variable is set in context.
1 | # check if variable 'my_var' is set in context |
Using hasattr()
Alternatively, you can also use built-in [hasattr()] function.
1 | note(hasattr(self.context, "my_var")) |
Using getattr()
If you are not sure if context variable is set, you can use built-in getattr() function.
1 | note(getattr(self.context, "my_var2", "was not set")) |
Using getsattr()
If you want to set context variable to a specific value, if the variable
is not defined in the context, use getsattr() function.
1 | from testflows.core import Test, note |
Arbitrary Variable Names
If you would like to add a variable that, for example, has empty spaces
and therefore would not be valid to be referenced directly
as an attribute of the context then you can use setattr() and getattr()
to set and get the variable respectively.
1 | with Test("my test") as test: |
Setups and Teardowns
Test setup and teardown could be explicitly specified using Given and Finally steps.
For example, Scenario that needs to do some setup and perform clean up as part of teardown can be defined as follows using explicit Given and Finally steps.
1 |
|
✋ It is recommended to use a decorated Given step that contains
yieldstatement in most cases. See Given Withyield.
✋ Given and Finally steps have MANDATORY flag set by default, and therefore these steps can’t be skipped.
✋ Finally steps must be located within
finallyblocks to ensure their execution.
Common Setup and Teardown
If multiple tests require the same setup and teardown and the result of the setup can be shared between these tests, then the common setup and teardown should be defined at the parent test level. Therefore, for multiple Scenarios that share the same setup and teardown, it should be defined at the Feature level and for multiple Features that share the same setup and teardown, it should be defined at the Module level.
For example,
1 | from testflows.core import * |
Handling Resources
When setup creates a resource that needs to be cleaned up, one must ensure that Finally step checks if Given has actually succeeded in creating the resource that needs to be cleaned up.
For example,
1 |
|
Multiple Setups and Teardowns
When a test needs to perform multiple setups and teardowns, then multiple Given and Finally can be used.
✋ Use And step to make test procedure more fluid.
1 |
|
✋ TE flag is always implicitly set for Finally steps to ensure that failure of one step does not prevent execution of other Finally steps.
Therefore,
2
3
4
5
do_first_cleanup()
with And("second clean up"):
do_first_cleanup()is equivalent to the following.
2
3
4
5
do_first_cleanup()
with And("second clean up", flags=TE):
do_first_cleanup()
Given With yield
Because any Given step usually has a corresponding Finally step
![]() supports
supports yield statement inside a decorated Given step
to convert the decorated function into a generator that
will be first run to execute the setup and then executed
a second time to perform the clean during the test’s teardown.
✋ It is an error to define a Given step that contains multiple
yieldstatements.
1 | from testflows.core import * |
Executing the example above shows that the Finally step gets executed at the end of the test.
1 | Sep 07,2021 19:26:23 ⟥ Scenario my scenario |
Yielding Resources
If Given step creates a resource, it can by yielded
as a value.
For example,
1 | from testflows.core import * |
produces the following output.
1 | Sep 07,2021 19:36:52 ⟥ Scenario my scenario |
Cleanup Functions
Explicit cleanup functions can be added by calling Context.cleanup() function.
For example,
1 | from testflows.core import * |
produces the following output.
1 | Sep 07,2021 19:58:11 ⟥ Scenario my scenario |
Returning Values
A test is not just a function but an entity that can either be run within caller’s thread, in another thread, in a different process, or even on a remote host. Therefore, depending on how a test is called, returning values from a test might not be as simple as when one calls a regular function.
Using value()
A generic way for a test to return a value is by using value() function. Test can call value() function to set one or more values.
For example,
1 |
|
The values can be retrieved using values attribute of the result of the test
1 | with Test("my test"): |
and using the value attribute of the result you can get the last value.
1 | with Test("my test"): |
Note that if the decorated test is called as a function
within the same test type, the return value is None
if the test function did not return any value using the return statement.
1 | with Step("my step"): |
But if the test does return a value, then it is set as the last value
in the values attribute of the result of the test.
1 |
|
Using return
The most convenient way a decorated test can return a value is by
using return statement. For example, a test step can be defined as follows:
1 |
|
and when called within another step, the returned value is received just like from a function.
1 | with Step("my step"): |
This is because calling a decorated test within a test of the same type, just runs the decorated test function and therefore the call is similar to calling a function with the ability to get the return value directly. See Calling Decorated Tests.
However, if you call a decorated test as a function
within a higher test type, for example calling a Step within a Test,
or when you call an inline defined test, then the return value
is a TestBase object and the returned value needs to be retrieved
as value attribute from the result attribute of the TestBase object,
or using values attribute to get a list of all the values produced by a test.
1 | with Test("my test"): |
Loading Tests
Using load()
You can use load() function to load a test or any object from another module.
For example, given a Scenario defined in tests/another_module.py
1 | from testflows.core import * |
then, using load() function you can load this test in another module and use it as a base test for an inline defined Scenario as follows.
1 | with Module("my module"): |
Using loads()
You can use loads() function to load one or more tests of a given test class.
1 | loads(name, *types, package=None, frame=None, filter=None) |
where
namemodule name or module*typestest types (Step, Test, Scenario, Suite, Feature, or Module), default: allpackagepackage name if module name is relative (optional)framecaller frame if module name is not specified (optional)filterfilter function (optional)
and returns list of tests.
For example, given multiple Scenarios defined in the same file, one can
use loads() function to execute all the Scenarios as follows
1 |
|
If a file contains multiple test types, then you can just specify them as needed. For example,
1 |
|
See also using current_module().
Using ordered()
By default, loads() function returns tests in random order. If you want a deterministic order, then use ordered() function to sort a list of tests loaded with loads() function by test function name.
For example,
1 |
|
Loading Modules
Using current_module()
Using current_module() function allows you to conveniently reference the current module. For example,
1 |
|
Using load_module()
The load_module() function allows to load any module by specifying the module name.
For example,
1 |
|
Combinatorial Tests
✋ Available in version >=
2.1.2
Combinatorial testing is supported by allowing to define tests that can take arguments, as well as allowing to easily define tests that check different combinations using TestSketches.
In addition, a convenient collection of tools used for combinatorial testing is provided including calculation of Covering Arrays for pairwise and n-wise testing using the IPOG algorithm.
Let’s see the basic application of combinatorial tests to testing a simple pressure switch
defined by the pressure_switch function below, where it has a fault when
pressure < 10 or pressure > 30, and volume > 250.
1 | def pressure_switch(pressure, volume): |
Simple Approach (Nested For-loops)
We can check all the combinations, including some extra values, using the following
TestScenario that uses nested for-loops to iterate over each combination of
pressure and volume values to check our Example: Pressure Switch.
1 |
|
As expected it will catch the fault in the following combinations:
1 | Failing |
Computed Combinations (Cartesian Product)
Another approach to using nested for-loops is to compute all the combinations
using the Cartesian Product function. Here is the
TestScenario that uses the product(*iterables, repeat=1) function
to compute all combinations of pressure and volume values to check our Example: Pressure Switch.
The advantage of using the cartesian product function is that it avoids writing nested for-loops and is much more scalable when the number of variables is large.
1 | from testflows.combinatorics import product |
Using Sketches
A simple approach to check all possible combinations is to use a TestSketch.
✋ Sketches currently do not support filtering or Covering Arrays. See Filtering Combinations and Covering Array Combinations for more details.
A TestSketch allows you to check all possible combinations, where each combination variable and its values are defined by the either() function. TestSketch with either() function makes writing combinatorial tests as simple as writing a simple test that would check one combination.
✋ If you call the either() function multiple times on the same line of code or you have a call to the either() function inside a
for-looporwhile-loop, then unique identifierimust be specified explicitly.
For the Example: Pressure Switch, our TestSketch would be as follows:
1 |
|
Each either() function defines a new combination variable and its possible values,
and then ![]() automatically loops through all the combinations
when a TestSketch is called.
automatically loops through all the combinations
when a TestSketch is called.
Running the TestSketch above results in the following output:
1 | Sep 22,2023 16:29:07 ⟥ Scenario check pressure switch, flags:TE |
Fails are reported as below.
1 | Failing |
A TestSketch allows for an advanced and intuitive definition of combinatorial tests especially when the number of combination variables grows.
Each call to the either() function must be unique, or a unique identifier i must be specified.
By default, the unique identifier of the either() function is the source code line number;
therefore, if you call the either() function multiple times on the same line of code
or you have a call to the either() function inside a for-loop or while-loop,
then the unique identifier i must be specified explicitly.
For example, let’s assume we have a function add(a, b, c) that we want to test.
1 | def add(a, b, c): |
We could write a TestSketch that calls the either() function inside a for-loop
on the same line multiple times as follows:
1 |
|
Note that we had to pass a unique identifier i for each either() function call that defined possible
values of a, b, and c. Also, note that the unique identifier was a combination of the variable name
and the loop variable i.
1 | add(a=either(1, 2, i=f"a{i}"), b=either(3, 4, i=f"b{i}"), c=either(5, 6, i=f"c{i}")) |
The TestSketch above results in the generation of eight combinations. This is because
range(1,2) is [1], and therefore the for-loop has only one iteration.
1 | for i in range(either(value=range(1, 2))): |
1 | Sep 22,2023 17:00:48 ⟥ Scenario check add |
Let’s change the for-loop so that it can iterate either one or two times.
1 |
|
Then the number of combinations will be 72, and it will not be that intuitive what each combination is.
The first run of the for-loop, where it iterates only once, will produce the same 8 combinations
as before. However, the second run of the for-loop, when it iterates twice, will
create combinations similar to the ones below. The combination 1 + 3 + 5
is followed by each of the 8 possibilities, including itself, and this is done for each
combination of a + b + c, and thus resulting in 8 * 8 + 8 = 72 total combinations.
1 | Sep 22,2023 17:08:13 ⟥ Combination pattern #8 |
Randomizing Combinations
Use the random test attribute of the TestSketch to randomize the order of combinations.
For example,
1 |
|
✋ See Using either() for how to randomize order for a given combination variable.
You can combine random with the limit test attribute. See the Limiting Number of Combinations section below.
Also, you can use the Args decorator to specify the default value of the random test attribute.
For example,
1 |
|
Limiting the Number of Combinations
Use the limit test attribute of the TestSketch to limit the number of combinations.
For example,
1 |
|
✋ See Using either() for how to limit the number of values for a given combination variable.
Use both the random and limit attributes of the TestSketch to execute a limited number of random
combinations.
For example,
1 | # Run the sketch only for the first 5 random combinations |
You can also use the Args decorator to specify the default value of the limit test attribute.
1 |
|
Using either()
The either() function selects values for a combination variable one at a time until all values are consumed.
✋ This function must be called only once for each line of code in the same source file, or a unique identifier
imust be specified.
✋ It is used in TestSketches to check all possible combinations. See Using Sketches.
Values can be specified either using *values or by passing an iterator or generator
as a value.
If neither *values nor value is explicitly specified, then *values
is set to a (True, False) tuple.
If random is True, then all values will be shuffled using the default shuffle function.
Optionally, you can pass a custom shuffle function that takes values as an argument
and modifies the sequence in place. By default, random.shuffle() is used.
You can use limit to limit the number of values to choose.
1 | either(*values, value=None, i=None, random=False, shuffle=random.shuffle, limit=None) |
where
*valueszero or more of values to choose fromvalueiterator or generator of valuesrandom(optional) randomize order of values (values must fit into memory), default:Falseshuffle(optional) custom function to shuffle the valueslimit(optional) limit number of values (integer> 0), default:Nonei(optional) unique identifier, default:None
Using Combination Outlines
TestSketch provides a very easy way to define a combinatorial test. However, Sketches do have their limitations, and sometimes using a Combination Outline is necessary.
1 |
Here is an example of using TestSketch for testing a few combinations of a calculator’s
+, -, *, and / operations when the user enters some positive or negative numbers,
and presses the = sign to get the results.
1 |
|
Let’s now implement the TestSketch above using a Combination Outline and the product() function
to see the difference between them.
1 |
|
As can be seen above, using an Outline is more involved and forces us to create a named variable for each combination variable and compute each combination explicitly using the cartesian product() function that produces combinations that need to be passed to the Outline, which then has to unpack the combination into its individual combination variables to be used in its test procedure.
However, a combination outline can provide more control over how a test iterates over each combination, allowing the possibility of filtering invalid combinations as well as the ability to use them with Covering Arrays.
| Feature | Sketch | Combination Outline |
|---|---|---|
| Ease of use | Easy | Moderate |
| Combination Filtering | No | Yes |
| Covering Arrays | No | Yes |
Filtering Combinations
Use a Combination Outline to filter invalid combinations.
For example,
1 |
|
Covering Array Combinations
Use a Combination Outline to generate a limited number of combinations using a Covering Array.
For example, with a CoveringArray(strength=3), we will have to only check 37 combinations
instead of all the 144 (2*3*4*2*3) combinations if we do not use a Covering Array, and instead do exhaustive testing.
1 |
|
Covering Arrays - (Pairwise, N-wise) Testing
The CoveringArray class allows you to calculate a covering array
for some k parameters having the same or different number of possible values.
The class uses IPOG, an in-parameter-order algorithm as described in IPOG: A General Strategy for T-Way Software Testing by Yu Lei et al.
For any non-trivial number of parameters, exhaustively testing all possibilities is not feasible.
For example, if we have 10 parameters (k=10) that each have 10 possible values (v=10), the
number of all possibilities is , thus requiring 10 billion tests for complete coverage.
Given that exhaustive testing might not be practical, a covering array could give us a much smaller
number of tests if we choose to check all possible interactions only between some fixed number
of parameters at least once, where an interaction is some specific combination, where order does not matter,
of some t number of parameters, covering all possible values that each selected parameter could have.
✋ You can find out more about covering arrays by visiting the US National Institute of Standards and Technology’s (NIST) Introduction to Covering Arrays page.
The CoveringArray(parameters, strength=2) takes the following arguments:
where,
parametersspecifies parameter names and their possible values and is specified as adict[str, list[value]], where key is the parameter name and value is a list of possible values for a given parameter.strengthspecifies the strengthtof the covering array that indicates the number of parameters in each combination, for which all possible interactions will be checked. Ifstrengthequals the number of parameters, then you get the exhaustive case.
The return value of the CoveringArray(parameters, strength=2) is a CoveringArray object that is an iterable
of tests, where each test is a dictionary, with each key being the parameter name and its value
being the parameter value.
For example,
1 | from testflows.combinatorics import CoveringArray |
Gives the following output:
1 | CoveringArray({'a': [0, 1], 'b': ['a', 'b'], 'c': [0, 1, 2], 'd': ['d0', 'd1']},2)[ |
Given that in the example above, the strength=2, all possible 2-way (pairwise)
combinations of parameters a, b, c, and d are the following:
1 | [('a', 'b'), ('a', 'c'), ('a', 'd'), ('b', 'c'), ('b', 'd'), ('c', 'd')] |
The six tests that make up the covering array cover all the possible interactions
between the values of each of these parameter combinations. For example, the ('a', 'b')
parameter combination covers all possible combinations of the values that
parameters a and b can take.
Given that parameter a can have values [0, 1], and parameter b can have values ['a', 'b']
all possible interactions are the following:
1 | [(0, 'a'), (0, 'b'), (1, 'a'), (1, 'b')] |
where the first element of each tuple corresponds to the value of the parameter a, and the second
element corresponds to the value of the parameter b.
Examining the covering array above, we can see that all possible interactions of parameters
a and b are indeed covered at least once. The same check can be done for other parameter combinations.
Checking Covering Array
The CoveringArray.check() function can be used to verify that the tests
inside the covering array cover all possible t-way interactions at least once and thus
meet the definition of a covering array.
For example,
1 | from testflows.combinatorics import CoveringArray |
Dumping Covering Array
The CoveringArray object implements a custom __str__ method, and therefore it can be easily converted into
a string representation similar to the format used in the NIST covering array tables.
For example,
1 | print(CoveringArray(parameters, strength=2)) |
1 | CoveringArray({'a': [0, 1], 'b': ['a', 'b'], 'c': [0, 1, 2], 'd': ['d0', 'd1']},2)[ |
Combinations
The combinations(iterable, r, with_replacement=False) function can be used to calculate
all the r-length combinations of elements in a specified iterable.
For example,
1 | from testflows.combinatorics import combinations |
1 | [('a', 'b'), ('a', 'c'), ('a', 'd'), ('b', 'c'), ('b', 'd'), ('c', 'd')] |
This function is equivalent to the standard library’s itertools.combinations.
Combinations With Replacement
You can calculate all combinations with replacement by setting the with_replacement argument to True.
For example,
1 | from testflows.combinatorics import combinations |
1 | [('a', 'a'), ('a', 'b'), ('a', 'c'), ('a', 'd'), ('b', 'b'), ('b', 'c'), ('b', 'd'), ('c', 'c'), ('c', 'd'), ('d', 'd')] |
The
with_replacement=Trueoption is equivalent to the standard library’s itertools.combinations_with_replacement.
Cartesian Product
You can calculate all possible combinations of elements from different iterables using
the cartesian product(*iterables, repeat=1) function.
For example,
1 | from testflows.combinatorics import * |
1 | [(0, 'a'), (0, 'b'), (1, 'a'), (1, 'b')] |
This function is equivalent to the standard library’s itertools.product.
Permutations
The permutations(iterable, r=None) function can be used to calculate
the r-length permutations of elements for a given iterable.
✋ Permutations are different from
combinations. In a combination, the elements don’t have any order, but in a permutation, the order of elements is important.
For example,
1 | from testflows.combinatorics import * |
1 | ('a', 'b'), ('a', 'c'), ('a', 'd'), ('b', 'a'), ('b', 'c'), ('b', 'd'), ('c', 'a'), ('c', 'b'), ('c', 'd'), ('d', 'a'), ('d', 'b'), ('d', 'c')] |
As we can see, both ('a', 'b') and ('b', 'a') elements are present.
This function is equivalent to the standard library’s itertools.permutations.
Binomial Coefficients
You can calculate the binomial coefficient, which is the same as
the number of ways to choose k items from n items without repetition and without order.
Binomial coefficient is defined as
when , and is zero when .
For example,
1 | from testflows.combinatorics import * |
1 | 6 |
which means that there are 6 ways to choose 2 elements out of 4.
This function is equivalent to the standard library’s math.comb.
Async Tests
Asynchronous tests are natively supported. All asynchronous tests get ASYNC flag set in flags.
✋ Note that the top level test must not be asynchronous.
If you try to run an asynchronous test as the top level test, you will get an error:
error: top level test was not started in main thread
Inline Async Tests
An inline asynchronous test can be defined using async with statement as follows.
1 | from testflows.core import * |
Decorated Async Tests
A decorated asynchronous test can be defined in a similar way as a non-asynchronous test.
The only difference is that the decorated function must be asynchronous
and be defined using async def keyword just like any other asynchronous function.
1 | from testflows.core import * |
✋ See asyncio module to learn more about asynchronous programming in Python.
Parallel Tests
Running Parallel Tests
Tests can be executed in parallel either using threads or an asynchronous executor defined using ThreadPool class or AsyncPool class respectively.
In order to run a test in parallel, it must either have PARALLEL flag
set or parallel=True specified during the test definition.
A parallel executor can be specified using executor parameter. If no executor
is explicitly specified, then a default executor is created for the
test of the type that is needed to execute a test.
✋ Note that the default executor does not have a limit on the number of parallel tests because the pool size is not limited.
Here is an example when executor is not specified.
1 | import time |
Using join()
The join() function can be used to join any currently running parallel tests. For example,
1 |
|
Parallel Executors
Parallel executors can be used to gain fine grained control over how many tests are executed in parallel.
✋ You should not share a single pool executor between different tests as it can lead to a deadlock given that a situation might arise when a parent test can be left waiting for the child test to complete, and a child test will not be able to complete due to the shared pool having no available workers.
If you want to share a pool between different tests, you must use either
SharedThreadPool class or SharedAsyncPool class for normal or asynchronous tests,
respectively. These classes ensure that a deadlock between a parent and child test is avoided
by blocking and waiting for the completion of any task that is submitted when no idle workers
are available.
Thread Pool
A thread pool executor is defined by creating an object of Pool class which is a short form for defining a ThreadPool class and will run a test in another thread.
The maximum number of threads can be controlled by setting max_workers
parameter, and by default is set to 16. If max_workers is set to None
then the pool size is not limited.
If there are more tasks submitted to the pool than there are currently available threads, then any extra tasks will block until a worker in the pool is freed up.
1 | with Pool(5) as pool: |
Async Pool
An asynchronous pool executor is defined by creating an object of AsyncPool class
and will run an asynchronous test using a new loop running in another thread unless
loop parameter is explicitly specified during executor object creation.
The maximum number of concurrent asynchronous tasks can be controlled by setting max_workers
parameter, and by default is set to 1024. If max_workers is set to None
then the pool size is not limited.
If there are more tasks submitted to the pool than there are currently available threads, then any extra tasks will block until a worker in the pool is freed up.
1 | with AsyncPool(5) as pool: |
Crossing Out Results
All test results except Skip result can be crossed out, including OK. This functionality is useful when one or more tests fail and you don’t want to see the next run fail because of the same test failing.
Crossing out a result means converting it to the corresponding crossed out result
that starts with X.
✋ The concept of crossing out a result should not be confused with expected results. It is invalid to say that, for example, XFail, means an expected fail. In general, if you expect a fail, then if the result of the test is Fail, then the final test result is OK and any other result would cause the final result to be Fail as the expectation was not satisfied.
The correct way to think about crossed out results is to imagine that a test summary report is printed on a paper, and after looking over the test results and performing some analysis, any result can be crossed out with an optional reason.
Only the result that exactly matches the result to be crossed out is actually crossed out. For example, if you want to cross out Fail result of the test but the test has a different result, then it will not be crossed out.
The actual crossing out of the results is done by specifying either xfails parameter of the test or using XFails decorator.
In general, the xfails are set at the level of the top test. For example,
1 |
|
All the patterns are usually specified using relative form and are anchored to the top level test during the assignment.
Setting or Clearing Flags
Test flags can be set or cleared externally using xflags or XFlags decorator. As long as the pattern has a chance of matching, this test attribute is pushed down the flow from parent test to child tests.
This allows setting or clearing flags for any child test at any level of the test flow including at the top level test.
For example,
1 |
|
Forcing Results
Test results can be forced, and the body of the test can be skipped by using ffails or FFails decorator. As long as the pattern has a chance of matching, this test attribute is pushed down the flow from parent test to child tests
This enables the result of any child test to be force at any level of the test flow, including at the top level test.
✋ When a test result is forced, the body of the test is not executed.
For example,
1 |
|
The optional when function can also be specified.
1 | def version(*versions): |
Forced Result Decorators
Forced result decorators such as Skipped, Failed, XFailed, XErrored, Okayed, and XOkayed can be used to tie the force result right where the test is defined.
✋ When a test result is forced, the body of the test is not executed.
These decorators are just a short-hand form of specifying forced results using ffails test attribute. Therefore, if parent test explicitly specifies ffails then it overrides forced results tied to the test.
✋ Only one such decorator can be applied to a given test. If you want to specify more than one forced result, use FFails decorator.
See also the description for the when condition.
Skipped
The Skipped decorator can be used to force Skip result.
1 |
|
Failed
The Failed decorator can be used to force Fail result.
1 |
|
XFailed
The XFailed decorator can be used to force XFail result.
1 |
|
XErrored
The XErrored decorator can be used to force XError result.
1 |
|
Okayed
The Okayed decorator can be used to force OK result.
1 |
|
XOkayed
The XOkayed decorator can be used to force XOK result.
1 |
|
Repeating Tests
You can repeat tests by specifying repeats parameter either explicitly for inline tests or using Repeats or Repeat decorator for decorated tests.
Repeating a test means to run it multiple times. For each run, a new Iteration is created, with the name being the index of the current iteration. The result of each iteration is counted, and failures are not ignored.
In general, it’s useful to repeat a test when you would like to confirm test stability. In addition to specifying repeats inside a test program, you can also pass [–repeat option] to your test program to specify which tests you would like to repeat from the command line.
✋ If you need to repeat a test and you would like to count onlythe last passing iteration, see Retrying Tests section.
You can combine Repeats with Retries and if done so, retries are performed for each Iteration.
By specifying until parameter, you can repeat a test until either pass, fail or complete criteria is met.
✋ Repeats can only be applied to tests that have a Test Type or higher. Repeating Steps is not supported.
Until Condition
pass
Until pass means that iteration over a test will stop before the specified number of repeats if an iteration has a passing results. Passing results include OK, XFail, XError, XOK, XNull.
fail
Until fail means that iteration over a test will stop before the specified number of repeats if an iteration has a failing results. Failing results include Fail, Error, and Null.
complete
Until complete indicates that iteration over a test will end only after the specified number of repetitions completes, regardless of the outcome of the result of each iteration.
Repeats
The Repeats decorator can be applied to a decorated test that has a Test Type or higher. Repeating test Steps is not allowed. The Repeats decorator should be used when you want to specify more than one test to be repeated. The tests to be repeated are selected using test patterns. The Repeats decorator sets repeats attribute of the test.
For example,
1 |
|
If you want to specify that only one test should repeat, it is more convenient to use Repeat decorator instead.
Repeat
The Repeat decorator is used to specify a repetition for a single test that has
a Test Type or higher. Repeating test Steps is not allowed. The Repeat decorator is
usually applied to the test to which the decorator is attached as, by default, the pattern is empty
and means it applies to the current test, and the until is set to complete
which means that the test will be repeated the specified number of times.
✋ If you need to specify repeat for more than one test, use Repeats decorator instead.
✋ Repeat decorator cannot be applied more than once to the same test.
For example,
1 |
|
If you want to specify a custom pattern or until condition, then pass them
using the parameters pattern and until respectively.
1 |
|
Repeating Code or Function Calls
When you need to repeat a block of code or a function call, you can use repeats class and repeat() function respectively. This class and function are flexible enough to repeat functions or inline code that contains tests.
Using repeats()
The repeats class can be used to repeat any block of inline code and is flexible enough to repeat code that includes tests.
It takes the following optional arguments:
1 | repeats(count=None, until="complete", delay=0, backoff=1, jitter=None) |
where
countnumber of iterations, default:Noneuntilstop condition, eitherpass,fail, orcomplete, default:completedelaydelay in seconds between iterations, default: 0 secondsbackoffbackoff multiplier that is applied to the delay, default: 1jitterjitter added to delay between iterations specified as a tuple(min, max), default:(0,0)
and returns an iterator that can be used in for loop. For each iteration,
the iterator returns an Iteration object that you can use to wrap the code that needs to be repeated.
For example, below, we repeat for the code 5 times until all iterations are complete using 0.1 sec delay
between each iteration, a backoff multiplier of 1.2, and jitter range between -0.05 min to 0.05 max.
1 | import random |
The code block is considered successful if no exception is raised during any of the iterations. If an exception is raised in the code, the corresponding iteration is marked as failed. The until condition controls when to stop iterations.
Using repeat()
The repeat() function can be used to repeat any function call including decorated tests.
It takes the following arguments, where only func is mandatory.
1 | repeat(func, count=None, until="complete", delay=0, backoff=1, jitter=None)(*args, **kwargs) |
where
funcis the function to be retriedcountis the number of iterations, default:Noneuntilstop condition, eitherpass,fail, orcomplete, default:completedelaydelay between iterations in seconds, default:0backoffdelay backoff multiplier, default:1jittertuple of the form(min, max)that specifies delay jitter normally distributed between theminandmaxvalues, default:None
that returns a wrapper function, which then can be called with any arguments that are
passed to the repeated func on each iteration.
For example,
1 | import random |
Here is an example that shows how repeat() function can be used to repeat a test step.
1 | import random |
The same behavior can be achieved by setting repeats attribute of the test.
1 |
|
You can also use repeat() function inside an inline step.
1 |
|
Retrying Tests
You can retry tests until they pass or until the number of retries is exhausted or a timeout is reached by specifying retries parameter either explicitly for inline tests or using Retries or Retry decorator for decorated tests.
Retrying a test means to run it multiple times until it passes. A pass means that a retry has either OK, XFail, XError, XNull, XOK, or Skip result.
For each attempt, a RetryIteration is created with a name corresponding to the attempt number. Any failures of an individual attempt are ignored except for the last retry attempt. The last RetryIteration is marked using LAST_RETRY flag.
In general, it’s useful to retry a test when test is unstable and sometimes could fail. However, you still would like to run it as long as it passes within the specified number of attempts or within a specified timeout period.
Retries
The Retries decorator can be applied to any decorated test, including steps or higher. The Retries decorator should be used when you want to specify more than one test to be retried. The tests to be retried are selected using test patterns. The Retries decorator sets retries attribute of the test and causes the test to be retried until either it passes, the maximum number of retries is reached, or timeout occurs if a timeout was specified.
The Retries decorator takes as an argument a dictionary of the following form
1 | { |
where
countis the number of retries, default:Nonetimeoutis timeout in seconds, default:Nonedelaydelay between retries in seconds, default:0backoffdelay backoff multiplier, default:1jittertuple of the form(min, max)that specifies delay jitter normally distributed between theminandmaxvalues, default:Noneinitial_delayinitial delay in seconds, default:0
If both count and timeout are specified, then the test is retried
either until the maximum retry count is reached or timeout is hit - whichever comes first.
✋ By default, if the number of retries or timeout is not specified, then the test will be retried until it passes, but note that if the test can’t reach a passing result then it can lead to an infinite loop.
For example,
1 |
|
will retry test my scenario 0 up to 5 times and my scenario 1 up to 10 times.
If you want to retry only one test, it is more convenient to use Retry decorator instead.
Retry
The Retry decorator is used to specify a retry for a single test that has
a Step Type or higher. The Retry decorator is
usually applied to the test to which the decorator is attached, as by default, the pattern is empty,
which means it applies to the current test.
The Retry decorator sets retries attribute
of the test and causes the test to be retried until either it passes, the maximum
number of retries or timeout is reached.
✋ If you need to specify retries for more than one test, use Retries decorator instead.
✋ Retry decorator cannot be applied more than once for the same test.
The Retry decorator can take the following optional arguments
1 | Retry(count=None, timeout=None, delay=0, backoff=1, jitter=None, pattern="", initial_delay=0) |
where
countis the number of retries, default:Nonetimeoutis timeout in seconds, default:Nonedelaydelay between retries in seconds, default:0backoffdelay backoff multiplier, default:1jittertuple of the form(min, max)that specifies delay jitter normally distributed between theminandmaxvalues, default:Nonepatternis the test name pattern, default:""which means the current testinitial_delayinitial delay in seconds, default:0
If both count and timeout are specified, then the test is retried until
either the maximum retry count is reached or timeout is hit - whichever comes first.
✋ By default, if number of retries or timeout is not specified, then the test will be retried until it passes, but note that if the test can’t reach a passing result then it can lead to an infinite loop.
For example,
1 |
|
or you can specify pattern explicitely. For example,
1 |
|
Retrying Code or Function Calls
When you need to retry a block of code or a function call, you can use retries class and retry() function respectively. This class and function are flexible enough to retry functions or inline code that contains tests.
Using retries()
The retries class can be used to retry any block of inline code and is flexible enough to retry code that includes tests.
It takes the following optional arguments:
1 | retries(count=None, timeout=None, delay=0, backoff=1, jitter=None, initial_delay=0) |
where
countis the number of retries, default:Nonetimeoutis timeout in seconds, default:Nonedelaydelay between retries in seconds, default:0backoffdelay backoff multiplier, default:1jittertuple of the form(min, max)that specifies delay jitter normally distributed between theminandmaxvalues, default:Noneinitial_delayinitial delay in seconds, default:0
and returns an iterator that can be used in for loop. For each iteration,
the iterator returns a RetryIteration object that wraps the code that needs to be retried.
For example, below we wait for the code to succeed within 5 sec using 0.1 sec delay
between retries and backoff multiplier of 1.2 with a jitter range
of -0.05 min to 0.05 max.
1 | import random |
The code block is considered successful if no exception is raised.
If an exception is raised, the code is retried until it succeeds, or, if specified, the maximum number of retries or timeout is reached.
Using retry()
The retry() function can be used to retry any function call, including decorated tests.
It takes the following arguments, where only func is mandatory.
1 | retry(func, count=None, timeout=None, delay=0, backoff=1, jitter=None, initial_delay=0)(*args, **kwargs) |
where
funcis the function to be retriedcountis the number of retries, default:Nonetimeoutis timeout in seconds, default:Nonedelaydelay between retries in seconds, default:0backoffdelay backoff multiplier, default:1jittertuple of the form(min, max)that specifies delay jitter normally distributed between theminandmaxvalues, default:Noneinitial_delayinitial delay in seconds, default:0
that returns a wrapper function, which then can be called with any arguments that are
passed to the retried func on each retry.
For example,
1 | import random |
Here is an example that shows how retry() function can be used to retry a test step.
1 | import random |
The same behavior can be achieved by setting retries attribute of the test.
1 |
|
You can also use retry() function inside an inline step.
1 |
|
Timing Out Tests
You can set a timeout for a test by specifying the timeouts parameter explicitly for inline tests or using the Timeouts or Timeout decorator for decorated tests.
Tests can have one or more Timeouts and inherit any timeouts from the parent test.
If started is not set, then the current test’s start time is used.
Timeouts are cumulative, and any explicitly set timeout can’t be overwritten. Timeouts are defined using a list of the Timeout objects.
Timeouts can also be set externally using the xargs parameter that sets the timeouts parameter. See the xargs for more details. Given that timeouts are cumulative, make sure that the pattern used in the xargs is unique and does not match the parent and its child tests at the same time, otherwise the list of timeouts will contain duplicate entries.
The test timeout is evaluated at the start of the test. If the timeout value is reached, a Fail result is raised, and the test body is not executed. Given that child tests inherit timeouts from the parent, the timeout is propagated down the test Test Program Tree.
✋ Given that the test timeouts are evaluated only at the start of the test, it means that timeouts can be exceeded in any code that does not include sub-tests or steps.
Here is an example of a test with a timeout that uses a step inside
the for-loop. The timeout will be hit during execution of the When step
as it will inherit the timeout from its parent.
1 | with Test("my test", timeouts=[Timeout(10)]): |
Here is an example of the test where the timeout will not be hit as there are no sub-tests or steps inside the for-loop.
1 | with Test("my test", timeouts=[Timeout(10)]): |
Timing and Timing Out Code
You can place stopwatches and timeouts in your test code using a Timer class object. The object should be used as the context manager that wraps the code that needs to be timed or checked for a timeout before it gets executed.
✋ The Timer object’s timeout is only evaluated during the start of the code wrapped with the timer context manager.
Using timer()
The timer is an alias for the Timer class object. See Using Timer.
Using Timer()
The Timer class object can be used to check for a timeout or as a stopwatch. Once created, it can be used as a context manager.
1 | Timer(timeout=None, message=None, started=None) |
where
timeouttimeout in sec, default:Non3messagecustom timeout error message, default:Nonestartedstart time, default:None(set to current time)
The object has an elapsed attribute to get the current elapsed time,
which is the difference between the current and the started time.
The Timer object can be used for checking for a timeout if the timeout parameter is set.
1 | timeout = Timer(10) |
The Timer class object can be re-used as the started time is fixed to the initial value.
1 | # started time is fixed here and is set to the current time by default |
Another approach is to keep the started time fixed explicitly as follows:
1 | started = time.time() |
The Timer object can also be used as a stopwatch if the timeout parameter is not specified.
1 | stopwatch = Timer() |
Using YML Config Files
All the test programs have a common optional --config argument that allows to
specify one or more configuration files in YML format.
The configuration files can be used to specify either common test program arguments
such as –no-colors, –output, etc. as well as custom
Command Line Arguments that were added using
argparser parameter.
✋ Technically YML files should always start with
---to indicate the start of a new document. However, in
Test Run Arguments
Common test run arguments such as –no-colors, –output, etc. must be specified
in the test run: section of the YML configuration file.
For example,
test.py
2
3
4
with Scenario("my test"):
pass
can be called with the following YML config file to set –output and –no-colors options for the test program to run.
config.yml
2
3
no-colors: true
output: progress
✋ Names of the common test run arguments have the same names as the correspondingcommand line option, without the
--prefix.For example,
--no-colorsisno-colors:--outputisoutput:--show-skippedisshow-skipped:
If you run test.py and apply the above config.yml you will see that the output format
for the test run will be set to progress and no terminal color highlighting will be applied
to the output.
1 | python3 test.py --config config.yml |
1 | Executed 1 test (1 ok) |
Custom Arguments
Test program custom Command Line Arguments that are added using argparser parameter can be specified at the top level of YML configuration file.
✋ Names of the custom options have the same names as the correspondingcommand line option without the
--prefix.For example,
--custom-argiscustom-colors:--buildisbuild:
For example,
test.py
2
3
4
5
6
7
def argparser(parser):
parser.add_argument("--custom-arg", type=str, help="my custom test program argument")
with Scenario("my test", argparser=argparser):
pass
and if you havee the following configuration file
config.yml
and apply it when running test.py then you will see that custom-arg value
will be set to the one you’ve specified in the config.yml.
1 | python3 test.py -c config.yml |
1 | Sep 24,2021 21:40:52 ⟥ Scenario my test |
Applying Multiple YML Files
If more than one YML configuration file is specified on the command line, the configuration files are then applied in the order specified, from left to right as specified on the command line, with the right most file having the highest precedence.
For example,
config1.yml
config2.yml
1 | python3 test.py -c config1.yml -c config2.yml |
1 | Sep 24,2021 21:48:47 ⟥ Scenario my test |
Adding Messages
You can add custom messages to your tests using note() function, debug() function, trace() function, and message() function.
✋ Use Python f-strings if you need to format a message using variables.
Using note()
Use note() function to add a note message to your test.
1 | note(message, test=None) |
where
messageis a string that contains your messagetest(optional) the instance of the test to which the message will be added, default: current test
For example,
1 | from testflows.core import * |
when executed shows the note message.
1 | Nov 15,2021 14:17:21 ⟥ Scenario my scenario |
Using debug()
Use debug() function to add a debug message to your test.
1 | debug(message, test=None) |
where
messageis a string that contains your messagetest(optional) the instance of the test to which the message will be added, default: current test
For example,
1 | from testflows.core import * |
when executed shows the debug message.
1 | Nov 15,2021 14:19:27 ⟥ Scenario my scenario |
Using trace()
Use trace() function to add a trace message to your test.
1 | trace(message, test=None) |
where
messageis a string that contains your messagetest(optional) the instance of the test to which the message will be added, default: current test
For example,
1 | from testflows.core import * |
when executed shows the trace message.
1 | Nov 15,2021 14:20:17 ⟥ Scenario my scenario |
Using message()
Use message() function to add a generic message to your test
that could optionally be assigned to a stream.
1 | message(message, test=None, stream=None) |
where
messageis a string that contains your messagetest(optional) the instance of the test to which the message will be added, default: current teststream(option) is a stream with which the message should be associated
For example,
1 | from testflows.core import * |
when executed shows the custom message.
1 | Nov 15,2021 14:37:53 ⟥ Scenario my scenario |
Using exception()
Use exception() function to manually add an exception message to your test.
1 | exception(exc_type, exc_value, exc_traceback, test=None) |
where
exc_typeexception typeexc_valueexception valueexc_tracebackexception tracebacktest(optional) the instance of the test to which the message will be added, default: current test
✋ The
exc_type,exc_value, andexc_tracebackare usually obtained from sys.exc_info() that must be called withinexceptblock.
For example,
1 | import sys |
when executed shows the exception message.
1 | Nov 15,2021 15:08:48 ⟥ Scenario my scenario |
Adding Metrics
You can add metric messages to your test using metric() function.
1 | metric(name, value, units, type=None, group=None, uid=None, base=Metric, test=None) |
where
namename of the metricvaluevalue of the metricunitsunits of the metric (string)type(optional) metric typegroup(optional) metric groupuid(optionl) metric unique identifierbase(optional) metric base class, default: Metric classtest(optional) the instance of the test to which the message will be added, default: current test
For example,
1 | from testflows.core import * |
when executed shows the metric message.
1 | Nov 15,2021 16:44:13 ⟥ Scenario my scenario |
You can use cat test.log | tfs show metrics command to see all the metrics for a given test.
See Show Metrics and Metrics Report.
For example,
1 | cat test.log | tfs show metrics |
1 | Scenario /my scenario |
Reading Input
You can read input during test program execution using input() function. This function is commonly used in Semi-Automated And Manual Tests.
1 | input(type, multiline=False, choices=None, confirm=True, test=None |
where
typeis either a string orresultfunction.multiline(optional) flag to indicate if input is multiline string, default:Falsechoices(optional) a list of valid options (only applies iftypeis string)confirm(optional) request confirmation, default:Truetestthe instance of the test that will be associated with the input message, default: current test
For example,
1 | from testflows.core import * |
when executed prompts for input
1 | Nov 15,2021 17:19:25 ⟥ Scenario my scenario |
Also, you can prompt for the result. For example,
1 | from testflows.core import * |
when executed prompts for result
1 | Nov 15,2021 17:22:26 ⟥ Scenario my scenario |
Test Program Options
Options
-h, –help
The -h, --help option can be used to obtain a help message that describes all the command line
options a test can accept. For example,
1 | python3 test.py --help |
-l, –log
The -l, --log option can be used to specify the path of the file where the test log will be saved.
For example,
1 | python3 test.py --log ./test.log |
–name
The --name option can be used to specify the name of the top level test.
For example,
1 | python3 test.py --name "My custom top level test name" |
–tag
The --tag option can be used to specify one or more tags for the top level test.
For example,
1 | python3 test.py --tag "tag0" "tag1" |
–attr
The --attr option can be used to specify one or more attributes for the top level test.
For example,
1 | python3 test.py --attr attr0=value0 attr1=value1 |
–debug
Enable debugging mode. Turned off by default.
–output
The --output option can be used to control the output format of messages printed to stdout.
–no-colors
The --no-colors option can be used to turn off terminal color highlighting.
–id
The --id option can be used to specify a custom Top Level Test id.
–show-skipped
Show skipped tests.
–show-retries
Show retried tests.
–test-to-end
Force all tests to be completed and continue the run even if one of the tests fails.
–first-fail
Force all tests to fail and stop the run on the first failing test.
Filtering
pattern
Options such as –only, –skip, –start, –end as well as –pause-before and –pause-after take a pattern to specify the exact test which the option will be applied.
The pattern is used to match test names using a unix-like file path pattern that supports wildcards
/path level separator*matches everything?matches any single character[seq]matches any character in seq[!seq]matches any character not in seq:matches anything at the current path level
✋ Note that for a literal match, you must wrap the meta-characters in brackets where
[?]matches the character?.
–only
The --only option can be used to filter the test flow so that only the specified tests
are executed.
✋ Note that mandatory tests will still be run.
✋ Note that most of the time the pattern should end with
/*so that any steps or sub-tests are executed inside the selected test.
For example,
1 | python3 test.py --only "/my test/*" |
–skip
The --skip option can be used to filter the test flow so that the specified tests
are skipped.
✋ Note that mandatory tests will still be run.
–start
The --start option can be used to filter the test flow so that the test flow starts at
the specified test.
✋ Note that mandatory tests will still be run.
–only-tags
The --only-tags option can be used to filter the test flow so that only
tests with a particular tag are selected to run and others are skipped.
✋ Note that mandatory tests will still be run.
–skip-tags
The --skip-tags option can be used to filter the test flow so that only
tests with a particular tag are skipped.
✋ Note that mandatory tests will still be run.
–end
The --end option can be used to filter the test flow so that the test flow ends at
the specified tests.
✋ Note that mandatory tests will still be run.
–pause-before
The --pause-before option can be used to specify the tests before which the test flow
will be paused.
–pause-after
The --pause-after option can be used to specify the tests after which the test flow
will be paused.
–pause-on-pass
The --pause-on-pass option can be used to specify the tests after which the test flow
will be paused if the test has a passing result.
–pause-on-fail
The --pause-on-fail option can be used to specify the tests after which the test flow
will be paused if the test has a failing result.
–repeat
The --repeat option can be used to specify the tests to be repeated.
–retry
The --retry option can be used to specify the tests to be retried.
–strict-names
The --strict-names option can be used to force strict test names by disallowing using any restricted characters.
Test Flags
![]() supports the following test flags.
supports the following test flags.
TE
Test to end flag. Continues executing tests even if this test fails.
UT
Utility test flags. Marks test as utility for reporting.
SKIP
Skip test flag. Skips the test during execution.
EOK
Expected OK flag. Test result will be set to Fail if the test result is not OK otherwise OK.
EFAIL
Expected Fail flag. Test result will be set to Fail if the test result is not Fail otherwise OK.
EERROR
Expected Error flag. Test result will be set to Fail if the test result is not Error otherwise OK.
ESKIP
Expected Skip flag. Test result will be set to Fail if the test result is not Skip otherwise OK.
XOK
Cross out OK flag. Test result will be set to XOK if the test result is OK.
XFAIL
Cross out Fail flag. Test result will be set to XFail if the test result is Fail.
XERROR
Cross out Error flag. Test result will be set to XError if the test result is Error.
XNULL
Cross out Null flag. Test result will be set to XNull if the test result is Null.
FAIL_NOT_COUNTED
Fail not counted. Fail result will not be counted.
ERROR_NOT_COUNTED
Error not counted. Error result will not be counted.
NULL_NOT_COUNTED
Null not counted. Null result will not be counted.
PAUSE_BEFORE
Pause before test execution.
PAUSE
Pause before test execution short form. See PAUSE_BEFORE.
PAUSE_AFTER
Pause after test execution.
PAUSE_ON_PASS
Pause after test execution on passing result.
PAUSE_ON_FAIL
Pause after test execution on failing result.
REPORT
Report flag. Mark test to be included for reporting.
DOCUMENT
Document flag. Mark test to be included in the documentation.
MANDATORY
Mandatory flag. Mark test as mandatory such that it can’t be skipped.
ASYNC
Asynchronous test flag. This flag is set for all asynchronous tests.
PARALLEL
Parallel test flag. This flag is set if test is running in parallel.
MANUAL
Manual test flag. This flag indicates that test is manual.
AUTO
Automated test flag. This flag indicates that the test is automated when parent test has MANUAL flag set.
LAST_RETRY
Last retry flag. This flag is auto-set for the last retry iteration.
Controlling Output
Test output can be controlled with -o or –output option, which specifies the output format to use
to print to stdout. By default, the most detailed nice output is used.
1 | -o format, --output format stdout output format, choices are: ['new-fails', |
For example, you can use the following test and see how the output format changes based on the output that is specified.
test.py
2
3
4
5
6
7
8
with Module("regression", flags=TE, attributes=[("name","value")], tags=("tag1", "tag2")):
with Scenario("my test", description="Test description."):
with When("I do something"):
note("do something")
with Then("I check the result"):
note("check the result")
nice Output
The nice output format is the default output format and provides the most
details when developing and debugging tests. This output format includes all test types,
their attributes and results, as well as any messages that are associated with them.
✋ This output format is the most useful for developing and debugging an individual test. This output format is not useful when tests are executed in parallel.
For example,
1 | python3 test.py --output nice |
1 | Sep 25,2021 9:29:39 ⟥ Module regression, flags:TE |
produces the same output as when –output is omitted.
1 | python3 test.py |
brisk Output
The brisk output format is very similar to nice output format but
omits all steps (tests that have Step Type). This format is useful when
you would like to focus on the actions of the test, such as commands executed
on the system under test, rather than on the test procedure itself.
✋ This output format is useful for debugging individual tests when you would like to omit test steps. This output format is not useful when tests are executed in parallel.
1 | python3 output.py -o brisk |
1 | Sep 25,2021 12:05:25 ⟥ Module regression, flags:TE |
short Output
The short output format provides a shorter output than nice output format
as only test and result messages are formatted.
✋ This output format is very useful to highlight and verify test procedures. This output format is not useful when tests are executed in parallel.
1 | python3 test.py -o short |
1 | Module regression |
classic Output
The classic output format shows only full test names for
any test with a Test Type of higher will receive test and result messages.
Tests with Step Type are not displayed.
✋ This output format can be used for CI/CD runs as long as the number of tests is not too large. This output format can be used when tests are executed in parallel.
1 | python3 test.py -o classic |
1 | ➤ Sep 25,2021 11:14:15 /regression |
progress Output
The progress output format shows the progress of the test run.
The output is always printed on one line on progress updates and is useful
when running tests locally.
Any test failures are printed inline as soon as they occur.
✋ This output format should not be used for CI/CD runs as it outputs terminal control codes to update the same line. This output format can be used when tests are executed in parallel.
1 | python3 test.py -o progress |
1 | Executing 2 tests /regression/my test/I do something |
fails Output
The fails output format only shows failing results Fail, Error, and Null
and crossed out the results XFail, XError, XNull, XOK.
Failing results are only shown for tests with Test Type of higher.
✋ This output format can be used for CI/CD runs as long as the number of crossed-out results is not too large; otherwise, use
new-failsoutput format instead. This output format can be used when tests are executed in parallel.
1 | python3 test.py -o fails |
1 | ✘ 3ms [ XFail ] /regression/my test |
new-fails Output
The new-fails output format only shows failing results Fail, Error, and Null.
Crossed out results are not shown.
Failing results are only shown for tests with Test Type of higher.
✋ This output format can be used for CI/CD runs. This output format can be used when tests are executed in parallel.
1 | python3 test.py -o new-fails |
1 | ✘ 3ms [ Fail ] /regression/my test |
slick Output
The slick output format provides even shorter output than short output format
as it only shows test and result messages for any test that has Test Type of higher.
Tests that have Step Type are not showed.
✋ This output format is more eye-candy. This output format is not useful when tests are executed in parallel.
1 | python3 test.py --output slick |
1 | ➤ Module regression |
quiet Output
The quiet output format does not output anything to stdout.
✋ This output format can be used for CI/CD runs. This output format can be used when tests are executed in parallel.
1 | python3 test.py -o quiet |
manual Output
The manual output format is only suitable for running manual or semi-automated
tests where the tester is constantly prompted for input. The terminal screen is always cleared
before starting any test with Test Type or higher.
✋ This output format is only useful for manual or semi-automated tests.
1 | python3 test.py -o manual |
raw Output
The raw output format outputs raw messages.
✋ This output format is only useful for
1 | python3 test.py -o raw |
1 | {"message_keyword":"PROTOCOL","message_hash":"1336ea41","message_object":0,"message_num":0,"message_stream":null,"message_level":1,"message_time":1632584893.162271,"message_rtime":0.009011,"test_type":"Module","test_subtype":null,"test_id":"/fd823a2c-1e17-11ec-8830-cb614fe11752","test_name":"/regression","test_flags":1,"test_cflags":0,"test_level":1,"protocol_version":"TFSPv2.1"} |
Advanced users can use this format to apply custom message transformations.
For example, it can be transformed using tfs transform nice command into nice
format
1 | python3 test.py -o raw | tfs transfrom nice |
or combined with other unix tools such as grep with further message transformations.
1 | python3 output.py -o raw | grep '{"message_keyword":"RESULT",' | tfs transform nice |
Summary Reports
Most output formats include one or more summary reports. These reports are printed after all tests have been executed.
✋ Most summary reports only include tests that have Test Type or higher. Tests with Step Type are not included.
Passing
This report generates Passing section and show passing tests.
1 | Passing |
Failing
This report generates Failing section and shows failing tests.
1 | Failing |
Known
This report generates Known section.
1 | Known |
Unstable
This report generates Unstable section. Tests are considered unstable
if they are repeated and different iterations have different results.
1 | Unstable |
Coverage
This report generates Coverage section. It is only generated if
at least one Specification is attached to any of the tests and shows
requirements coverage statistics for each Specification.
1 | Coverage |
Totals
This report generates test counts and total test time section.
1 | 1 module (1 ok) |
Version
This report generates a message that shows the date time of the test run and the version of the framework that was used to run the test program.
1 | Executed on Sep 25,2021 12:05 |
Turning Off Color Highlighting
There are times when color highlighting might be in the way. For example,
when piping output to a different utility or saving it into the file.
In both of these cases, use –no-colors to tell ![]() to turn off adding terminal control color codes.
to turn off adding terminal control color codes.
1 | python3 test.py --no-colors > nice.log |
or
1 | python3 test.py --no-colors | less |
The same option can be specified for the tfs utility.
1 | cat test.log | tfs --no-colors show messages |
or
1 | tail -f test.log | tfs --no-colors transform nice | less |
Use --no-colors in Code
You can also detect if terminal color codes are turned off in code
by looking at settings.no_colors attribute, as follows
1 | import testflows.settings as settings |
Forcing To Abort on First Fail
You can force a test program to abort on first failure irrespective of the presence of TE flags by using –first-fail test program argument.
For example,
1 | python3 test.py --first-fail |
Forcing To Continue on Fail
You can force the test program to continue running if any of the tests fail irrespective of the presence of TE flags by using –test-to-end test program argument.
For example,
1 | python3 test.py --test-to-end |
Enabling Debug Mode
You can enable debug mode by specifying –debug option to your test program. When debug mode is enabled, the tracebacks will include more details, such as internal function calls inside the framework that are hidden by default to reduce clutter.
1 | python3 test.py --debug |
Use --debug in Code
You can also trigger actions in your test code based on if –debug option
was specified or not. When –debug option is specified, the value
can be retrieved from settings.debug as follows
1 | import testflows.settings as settings |
Getting Test Time
Using current_time()
✨ Available in 1.7.57
You can get current test execution time using current_time() function.
1 | current_time(test=None) |
where
test(optional) the instance of the test for which a test time should be obtained, default: current test
The returned value is fixed after test has finished its execution.
For example,
1 | from testflows.core import * |
Show Test Data
After the test program is executed, you can retrieve different test data related to the test run
using tfs show command.
The following commands are available:
1 | tfs show -h |
1 | commands: |
Show Metrics
Use tfs show metrics command to show metrics for a given test.
1 | positional arguments: |
For example,
1 | cat test.log | tfs show metrics |
Using Secrets
Secrets are values that you would like to hide in your test logs, for example, passwords,
authentication keys, or even usernames, etc.
In ![]() , a secret can be defined using Secret class.
, a secret can be defined using Secret class.
1 | Secret(name, type=None, group=None, uid=None) |
where
nameis a unique name of the secrettypesecret type (optional)groupsecret group (optional)uidsecret unique identifier (optional)
When creating a secret,only the name is required, the other arguments type,
group, uid, are optional.
The name must be a valid regex group name as defined by Python’s re module. For example, no spaces or dashes are allowed in the name, you must use underscores instead.
1 | # secret = Secret("my secret")("my secret value") # invalid, empty spaces not allowed |
If a name is invalid, you will see an exception as follows,
1 | 16ms ⟥ Exception: Traceback (most recent call last): |
Here is an example of how to create and use secrets,
1 | from testflows.core import * |
1 | Mar 03,2022 11:22:01 ⟥ Scenario using secrets |
Secret values are only filtered by ![]() in messages added to the test by message() function,
note() function, debug() function, trace() function and messages in results.
in messages added to the test by message() function,
note() function, debug() function, trace() function and messages in results.
If you need to create multiple secrets, the names of each secret must be unique otherwise, you will get an error.
1 | Mar 24,2022 9:54:46 ⟥ Scenario using secrets |
Here is an example of creating multiple secrets,
1 | with Scenario("using secrets"): |
Note, that multiple secrets can have the same secret value. For example,
1 | with Scenario("using secrets"): |
Secrets in Argument Parser
You can easily use secrets in the Argument Parser by setting type of
the argument to the Secret class object.
For example,
1 | def argparser(parser): |
Testing Documentation
Use testflows.texts module to help you write auto verified software documentation
by combining your text with the verification procedure for the described functionality,
in the same source file while leveraging the power and flexibility of ![]() .
.
By convention the .tfd extension is used for source files for auto verified documentation
and are written using Markdown. Therefore, all .tfd files are valid
Markdown files. However, .tfd files are only the source files for your documentation
that must be executed using tfs document run command to produce the final
Markdown documentation files.
1 | tfs document run --input my_document.tfd --output my_document.md |
Installing testflows.texts
You can install testflows.texts using pip3 command:
1 | pip3 install --upgrade testflows.texts |
After installing testflows.texts you will also have tfs command available in your environment.
Writing Auto Verified Docs
Follow the example Markdown document to get to know how you can write auto verified docs yourself.
1 | ## This is a heading |
Now, if you want to give it a try, then save the above Markdown into test.tfd file, but make sure
to remove the indentation.
Then you can run it as
1 | tfs document run -i test.tfd -o - |
and you should get the output of the final Markdown document printed to the stdout.
1 | tfs document run -i test.tfd -o - |
Testing Documentation Tutorial
Here a simple tutorial to introduce you to using testflows.texts.
1 | # TestFlows Texts Tutorial |
Now save this source file as tutorial.tfd and execute it to produce the final Markdown
file tutorial.md that we can use on our documentation site.
1 | tfs document run -i tutorial.tfd -o tutorial.md |
We know that the instructions in this article are correct as testflows.texts has executed them during the
writing of tutorial.md just like a technical writer would execute the commands
as part of the process of writing a technical article.
Moreover, we can rerun our documentation any time a new version of ls utility is ready
to be shipped to make sure our documentation is still valid and the software still behaves as described.
By the way, here is the final Markdown we get
1 | # TestFlows Texts Tutorial |
Passing Arguments
Execution of any .tfd file using tfs document run command results in execution of a document writer program.
This is comparable to the test programs you write with ![]() .
.
You can control different aspects of writer program’s execution by passing arguments as follows.
1 | tfs document run -t test.tfd -o test.md -- <writer program arguments> |
For example, to see all the arguments your document writer program can take pass -h/--help argument
1 | tfs document run -- --help |
Controlling Output Format
By passing -o/--output argument to your writer program, you can control output format
For example,
1 | tfs document run -i test.tfd -o test.md -- --output classic |
See -h/--help for other formats.
Debugging Errors
Here are some common errors that you might run into while writing your .tfd source files.
All exceptions will point to the line number indicating where the error occurred.
Unescaped Curly Brackets
If you forget to double your curly brackets when you are not using f-string expression then you will see an error.
For example,
1 | Hello there |
when executed will result in the NameError.
1 | 10ms ⟥⟤ Error test.tfd, /test.tfd, NameError |
Syntax Errors
If you have a syntax error in the python:testflows block, you will get an error.
For example,
1 | Hello there |
1 |
|
Triple Quotes
If your text has triple quotes, like """ it will result in an error.
For example,
1 | Hello There |
when executed will result in SyntaxError.
1 | 9ms ⟥⟤ Error test.tfd, /test.tfd, SyntaxError |
The workaround is to use {triple_quotes} expression to output """.
For example,
1 | Hello There |
where triple_quotes is provided by default by testflows.texts module. This is equivalent to the following.
1 | ```python:testflows |
Using tfs document run
1 | tfs document run -h |
1 | usage: tfs document run [-h] [-i path [path ...]] [-o [path]] [-f] |